
Well, here it is…as promised. Here is my new method for fabric folding. I decided to be all fancy this time and actually labeled the photographs so that you know what is going on in the random pictures of fabric. lol.
I’m going to talk about three different ways to fold fabric, though two of them are pretty darn similar.
First, I want to talk about how to fold a piece of fabric that is approximately a half yard or larger. Here is the look we are going for, just so you have a vision of what your stash could look like:
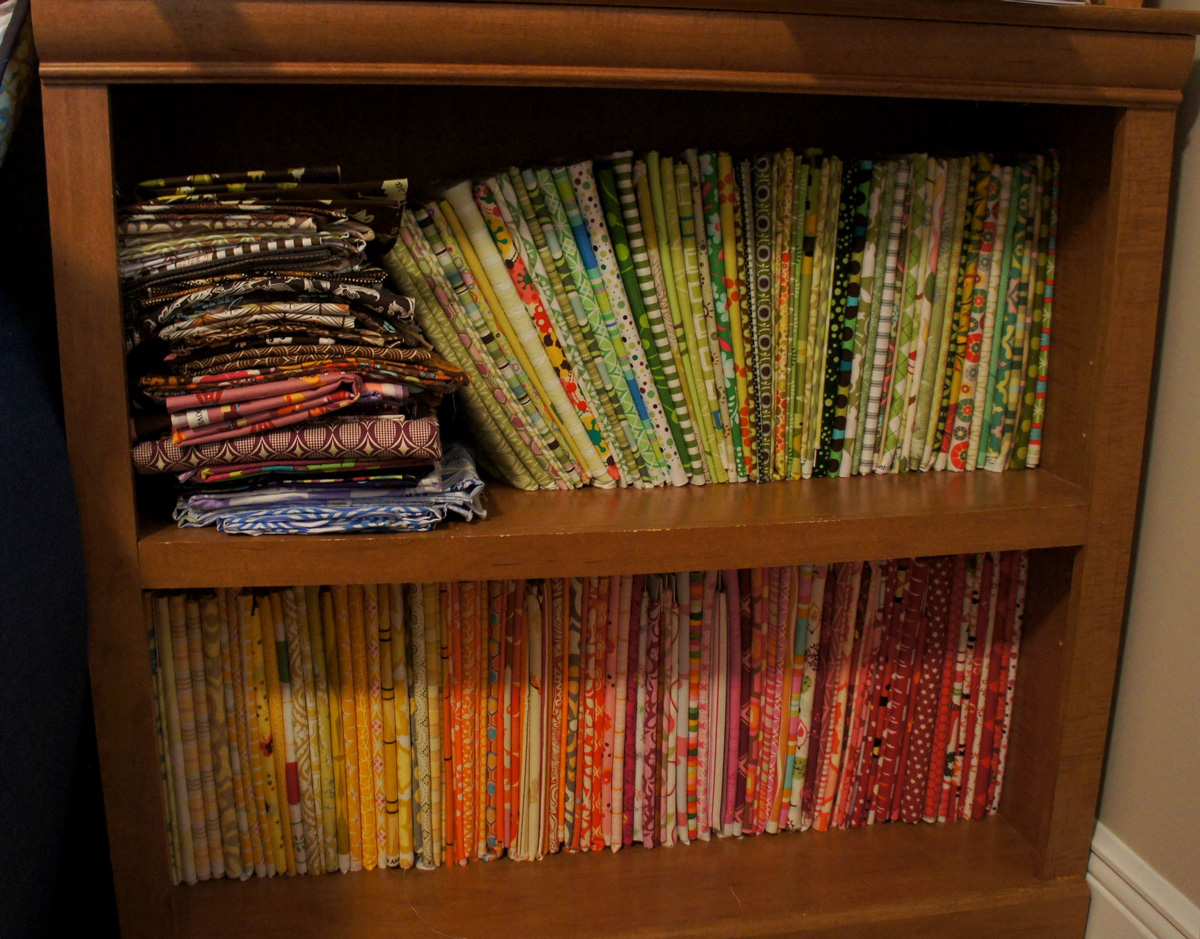
Notice the less than a tidy stack of fabrics on the left…this is what would inevitably happen to all of my fabrics when I stacked them on top of each other. For me, personally, stacking the fabrics on top of each other is generally not the best method to keep my fabric organized. I find that I can not see the fabrics as well and I can’t access them as easily. So I began my search for a method that would allow me to organize my fabric vertically. In essence, I wanted to feel like I have my own fabric bolts on the shelf.
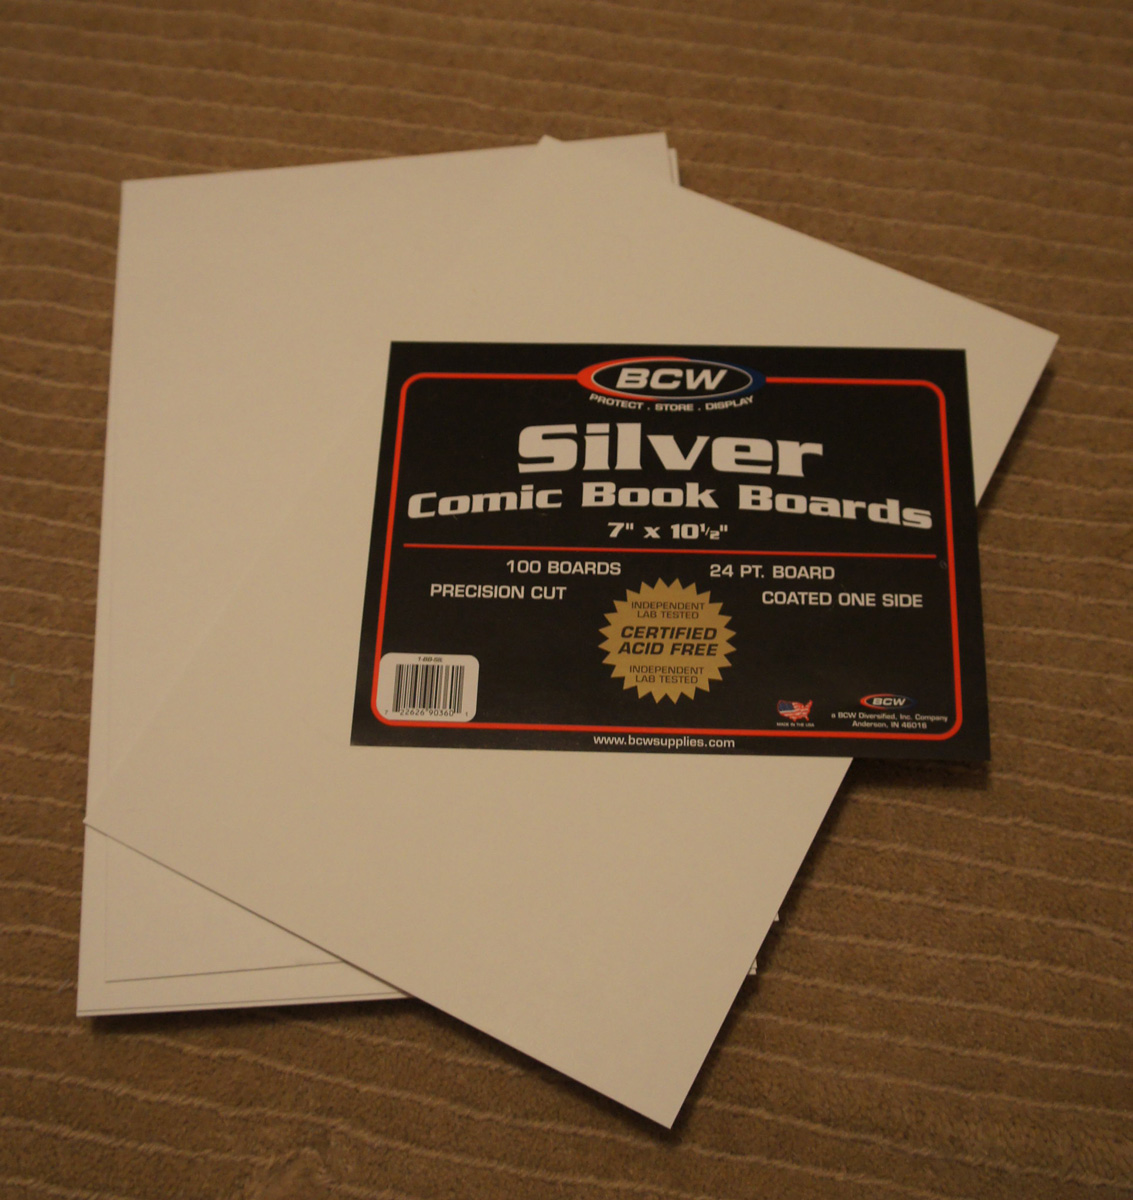
And then in the world of Flickr and blogland (because I in no way claim intellectual property over this method!), I found a method that looked both tidy, quick, and was economical. The solution? Comic Book Backer Boards. Don’t know what they are? Well neither did I…and I certainly never thought I would be buying literally hundreds of them, but I believe that they are a fairly heavyweight card stock that comic book owners use to help store the comic books in a flat, straight, non-bendy kind of way. So we are essentially going to use them to do the same thing for fabric.
This is the brand that I have used and the size that I am happy using. But there are some varieties out there so feel free to experiment with what works for you best. *ETA: I meant to mention in the post originally, but this really is the most economical method for wrapping fabric around a board. A pack of 100 cost me approximately $9.00 in the store. I think it can be a bit more expensive but perhaps more easy to order them online. I personally did not have any problems finding a local comic book store though.*
Funny Note: I first purchased these at a local comic book store that happened, by coincidence, to be located right next door to a quilt shop. I cautiously entered the store, a place I have never frequented before, and inquired about the boards. The man behind the counter told me where they were and I felt the need to tell him why I was looking for them. I personally expected him to be surprised at the ingenuity and new use of his product. But he just nodded and smiled and said he sells a lot more of these to quilters than he does to comic book owners. LOL. So much for thinking it was fairly unheard-of concept. He even told me which type the quilters normally purchased. (I ended up with another one, but that’s because I don’t like to follow the pack)
But back to fabric folding…
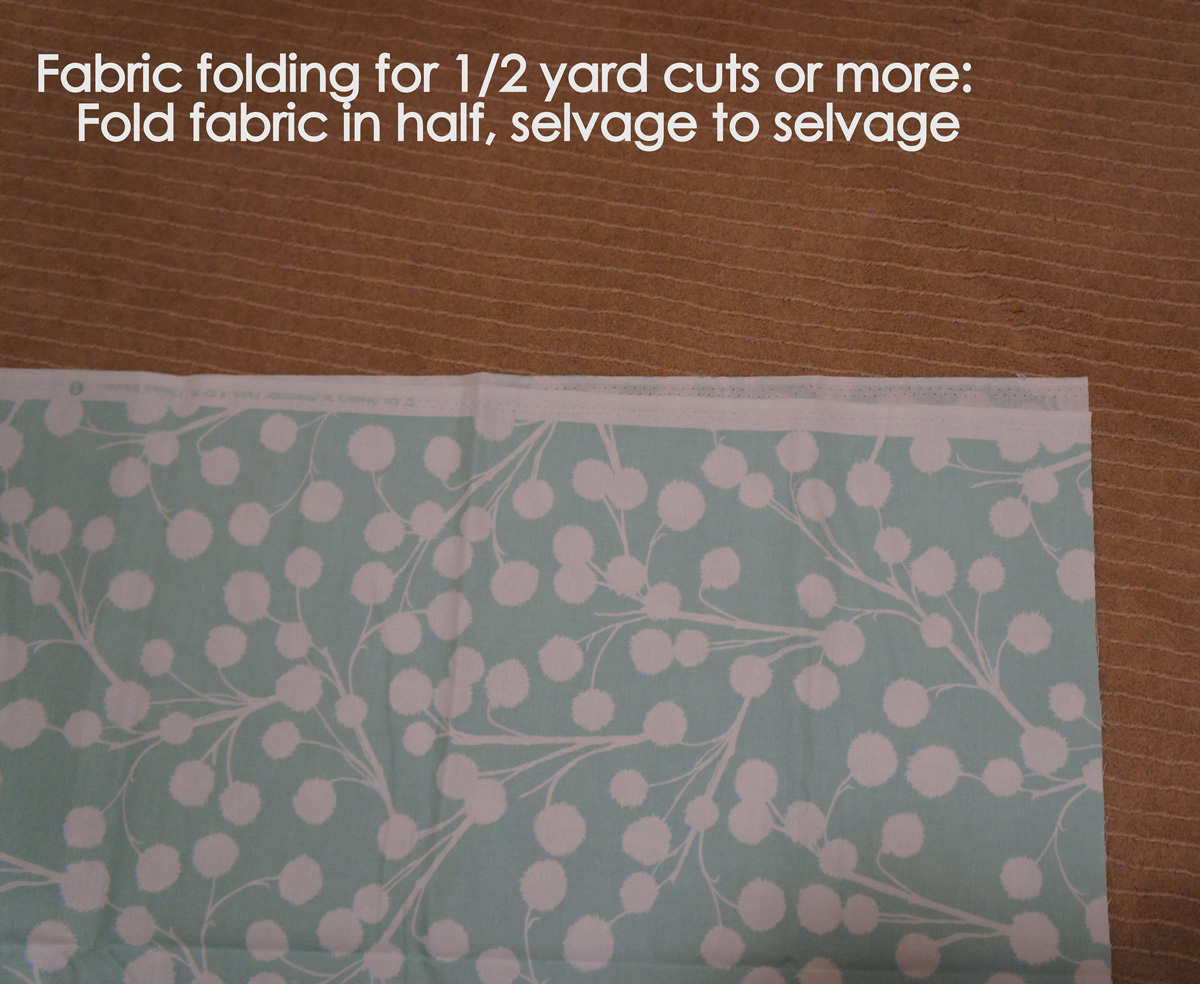
Start with a piece of fabric a half yard or larger, approximately 44″ wide (a standard cotton width). Fold the fabric in half from selvage to selvage.
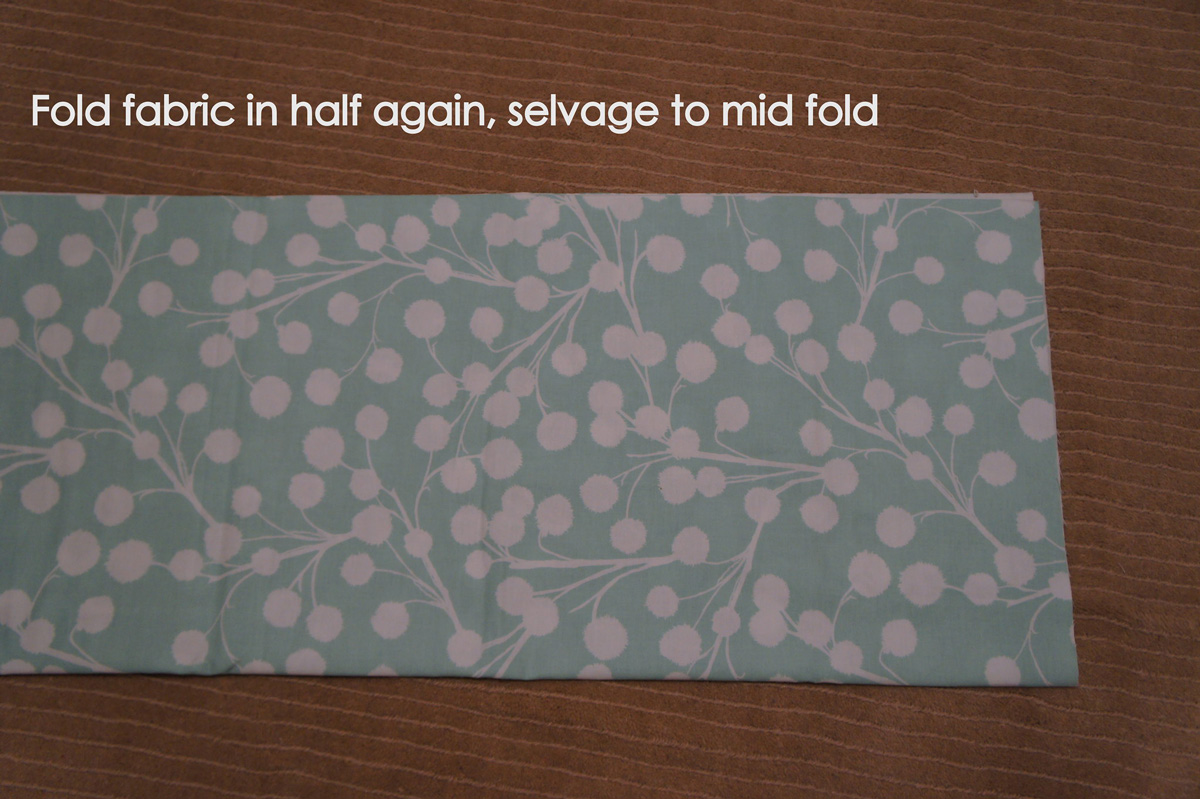
Smooth the fabric from end to end and then fold in half again, matching the mid-fold to the selvage edges.
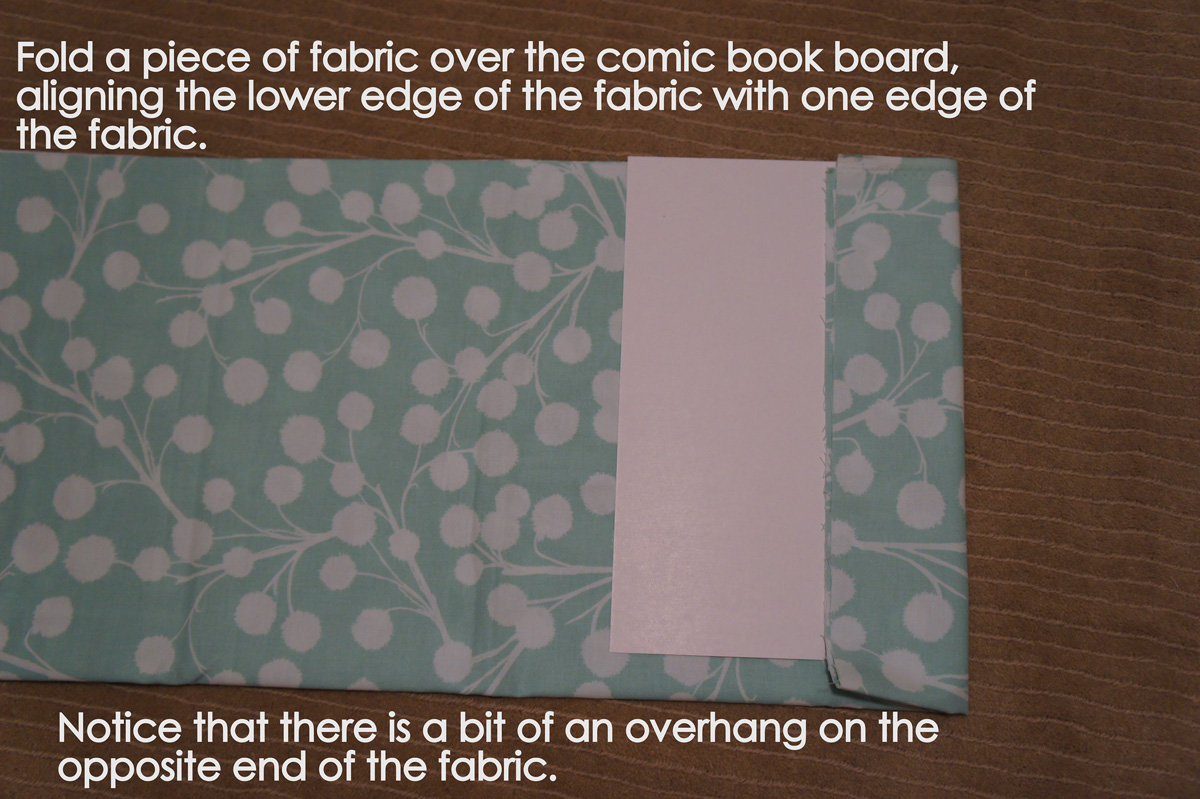
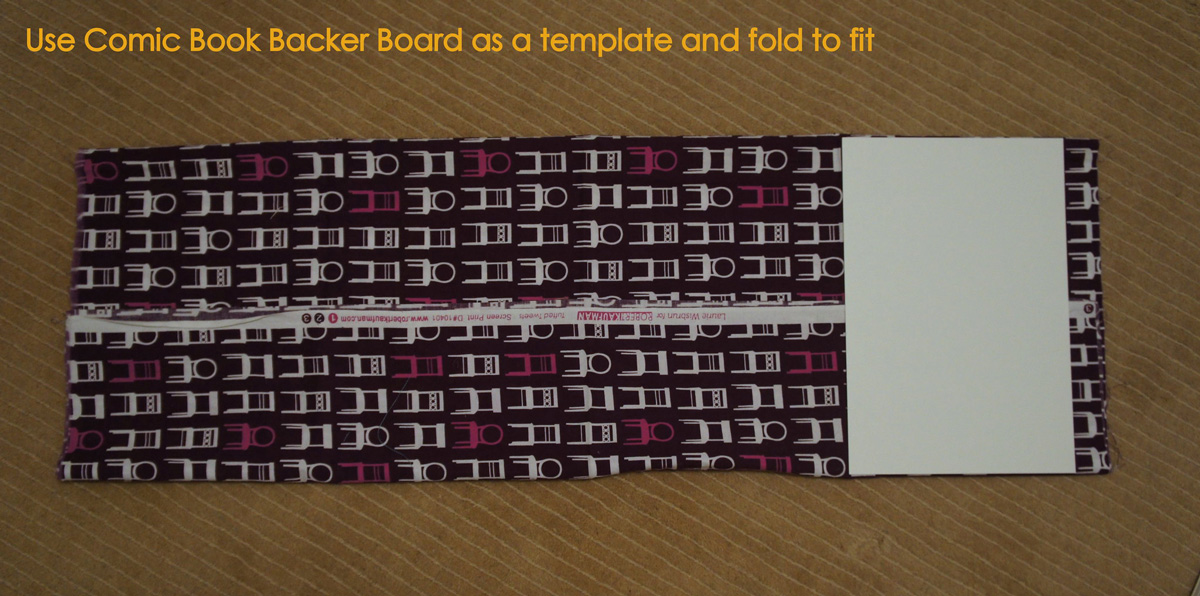
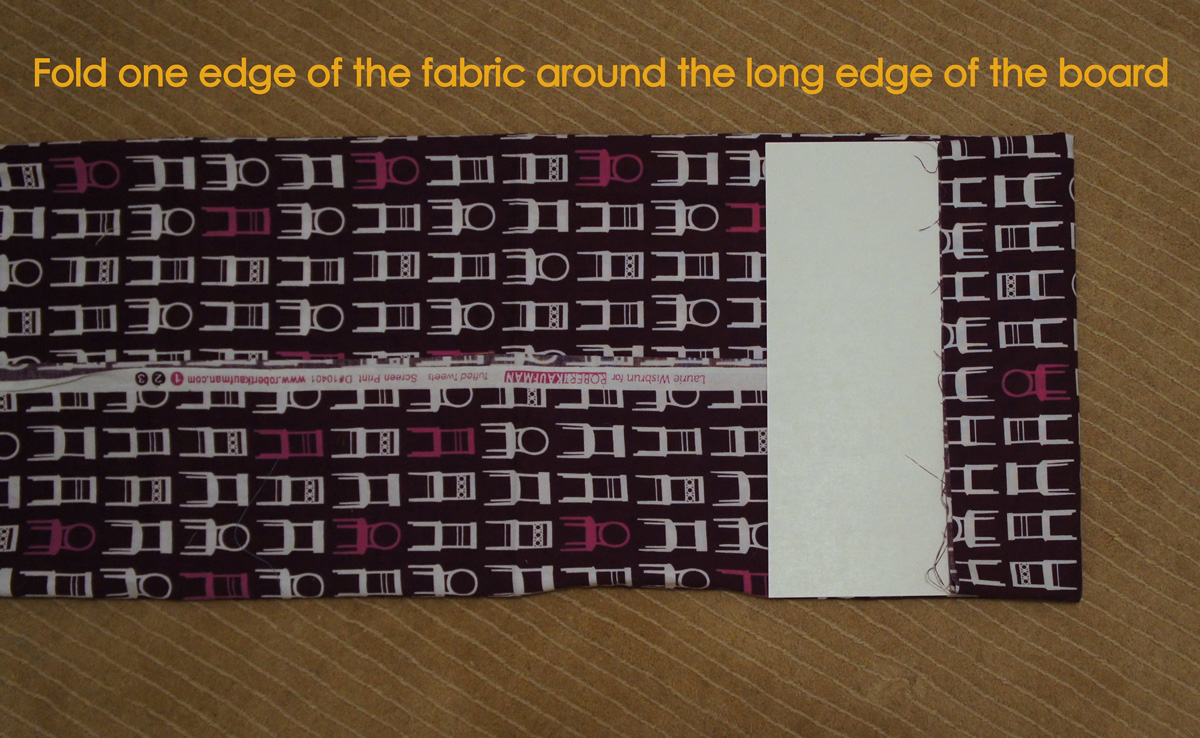
Now place one piece of the comic book backer board on the fabric and fold a couple of inches over the board on one end. There will most likely be a bit of extra fabric overhanging the top of the board. This is fine…we want one end of the board to be flush with the selvage edge of the fabric.
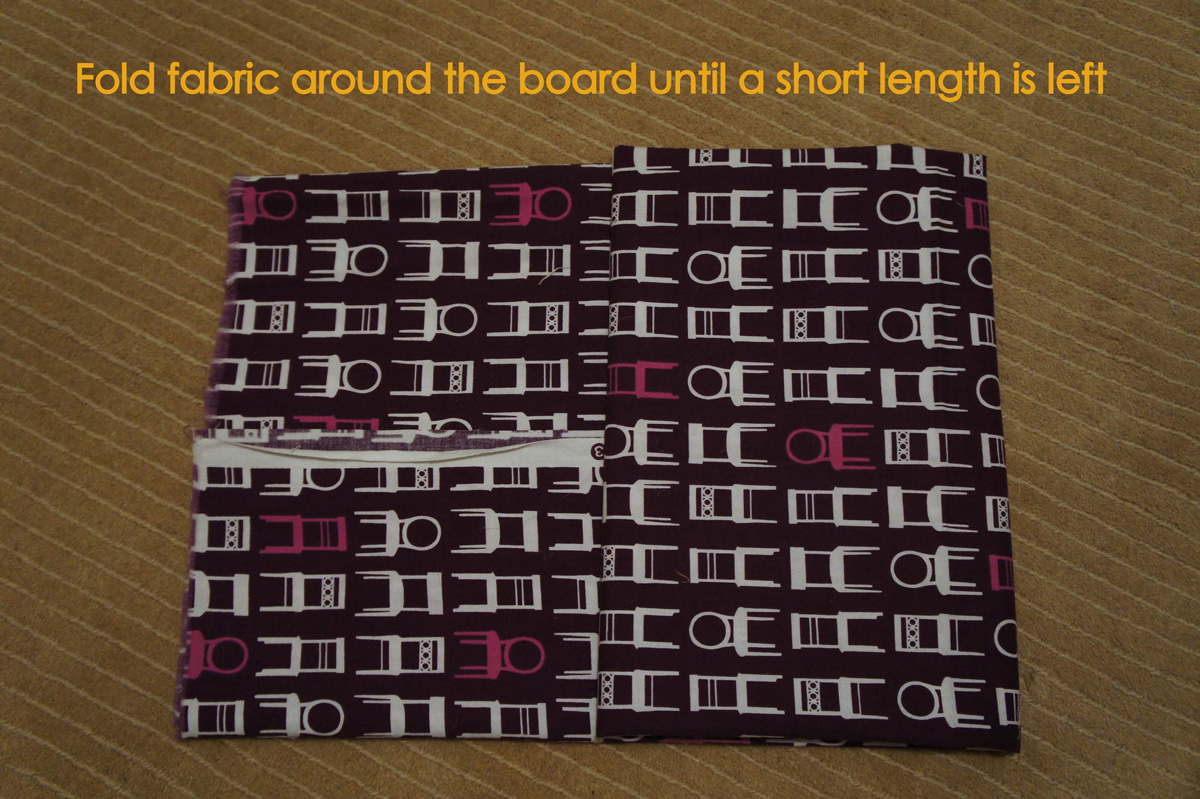
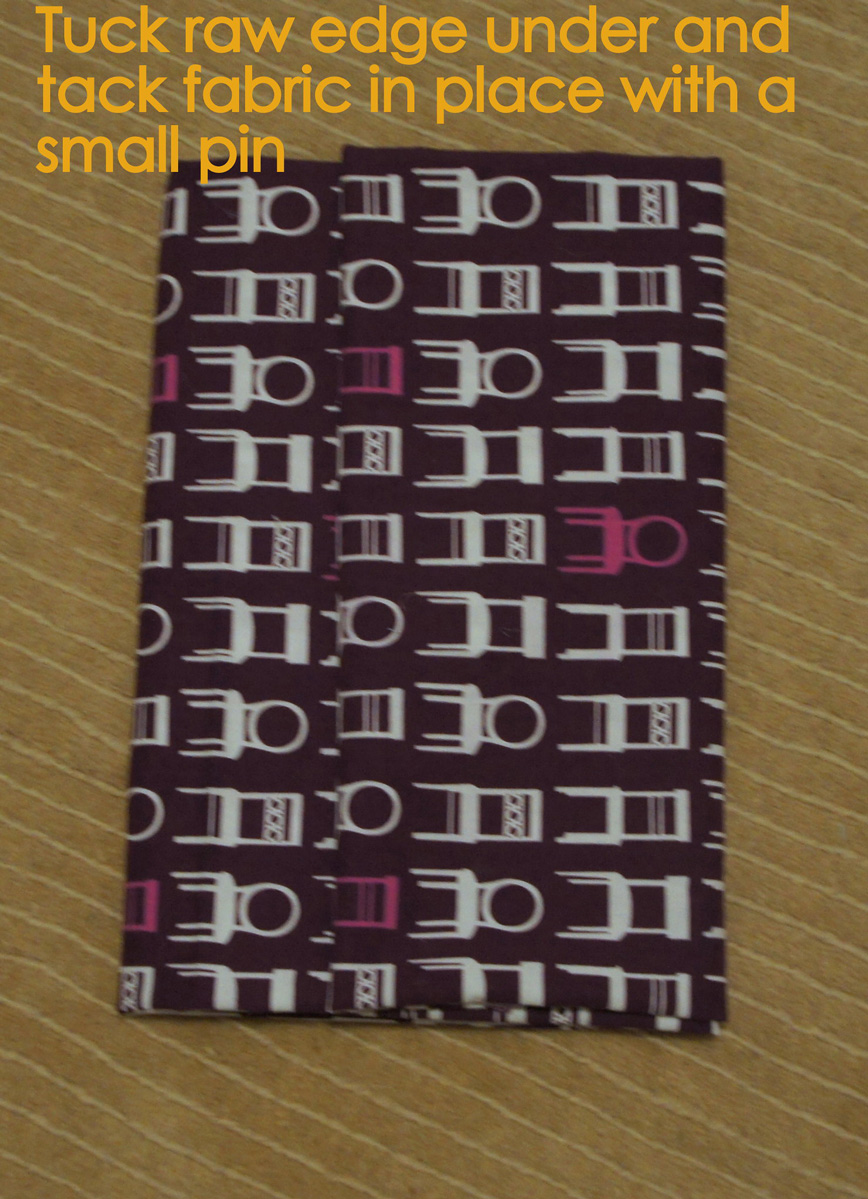
Continue to fold the fabric over the board until you reach the end and then use a small pin to hold the last fold in place.
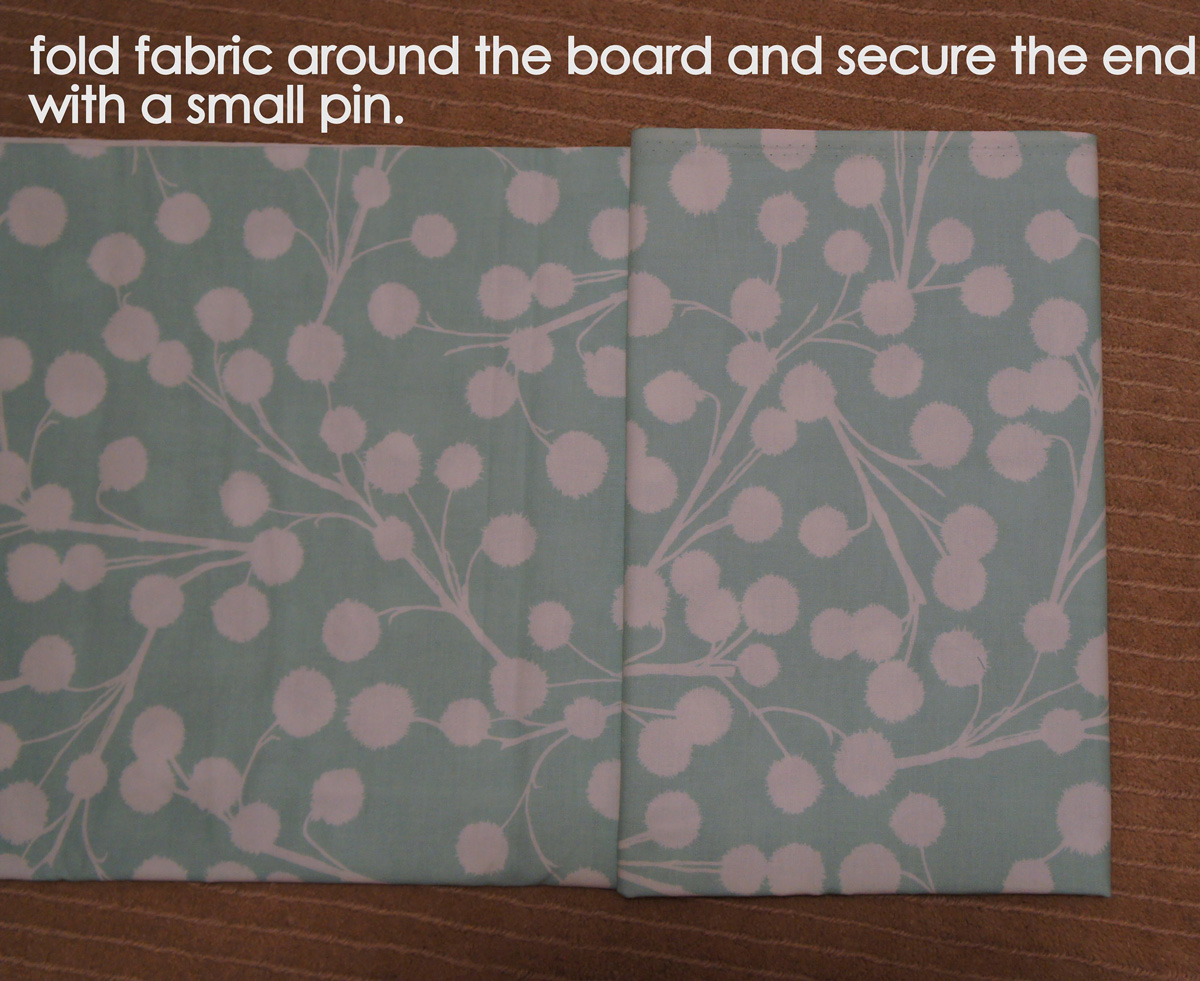
Easy as pie! (what an odd phrase…pie is NOT easy! But ooohh…my husband makes the BEST cherry pie. Come and visit and I promise I’ll sweet talk him into making it!)
So that’s great…but we don’t always have a half of a yard or more of fabric…or we’ve done a funny cut on our piece of fabric. Here is how I fold my fabric if I have cut away from the fabric along the selvage edge and the fabric is no longer 44″ wide. I’ll let pictures do the work here…
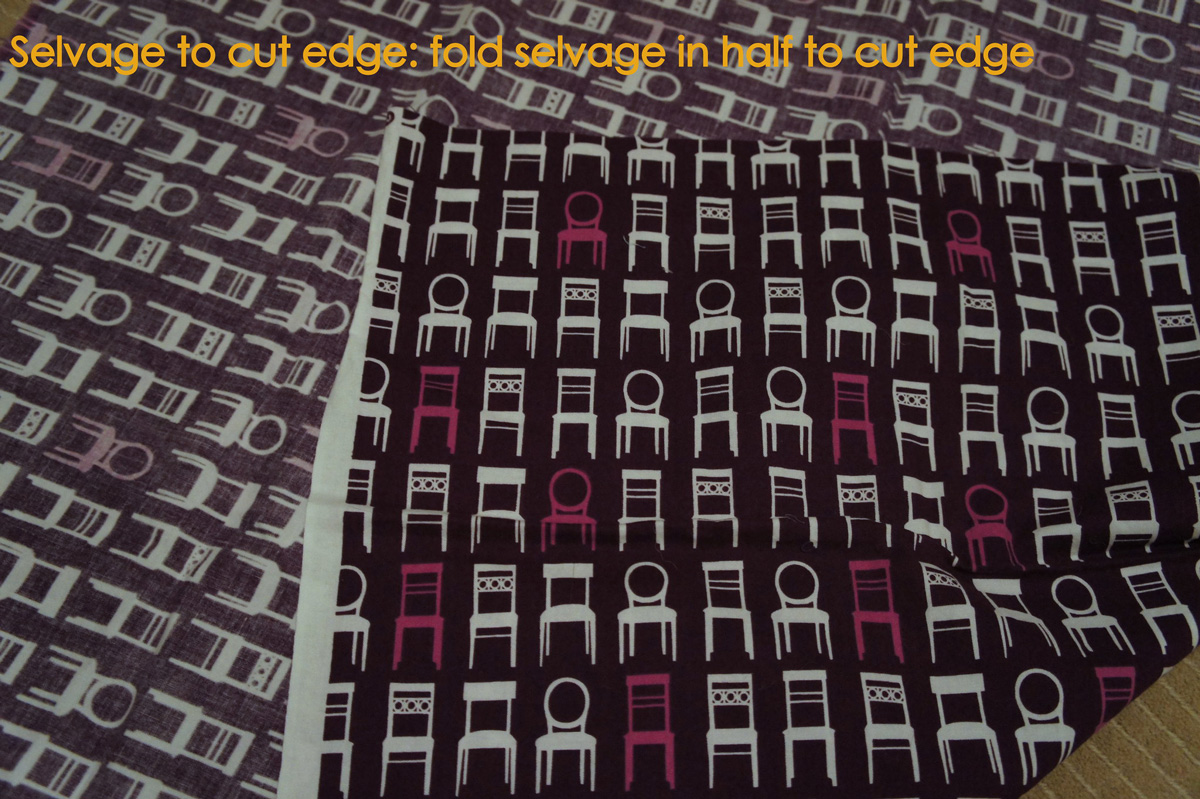
So now you have a long piece of fabric with the selvage edge folded over to meet the cut edge.
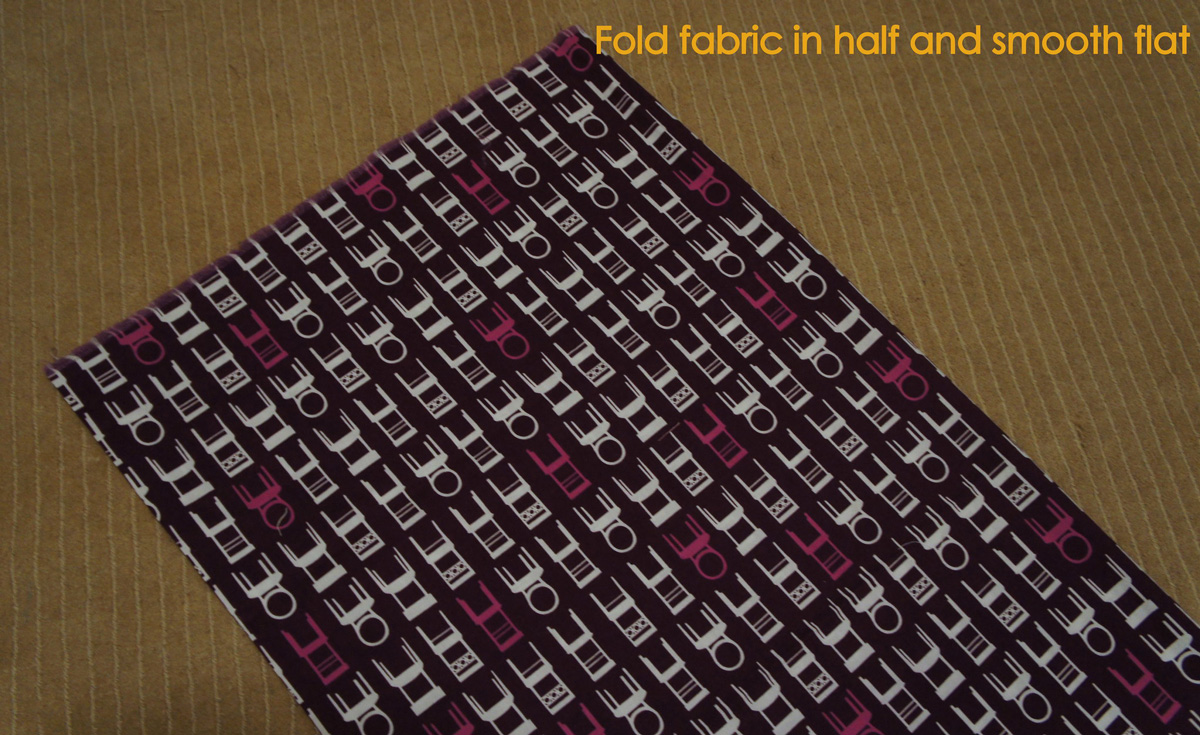
Next, fold the fabric so that the fabric matches the total height of the board.
If your fabric is still intact from selvage to selvage but is less than a 1/2 yard, you can wrap the fabric around the board, but you will need to wrap it along the length of the fabric rather than the folded width.
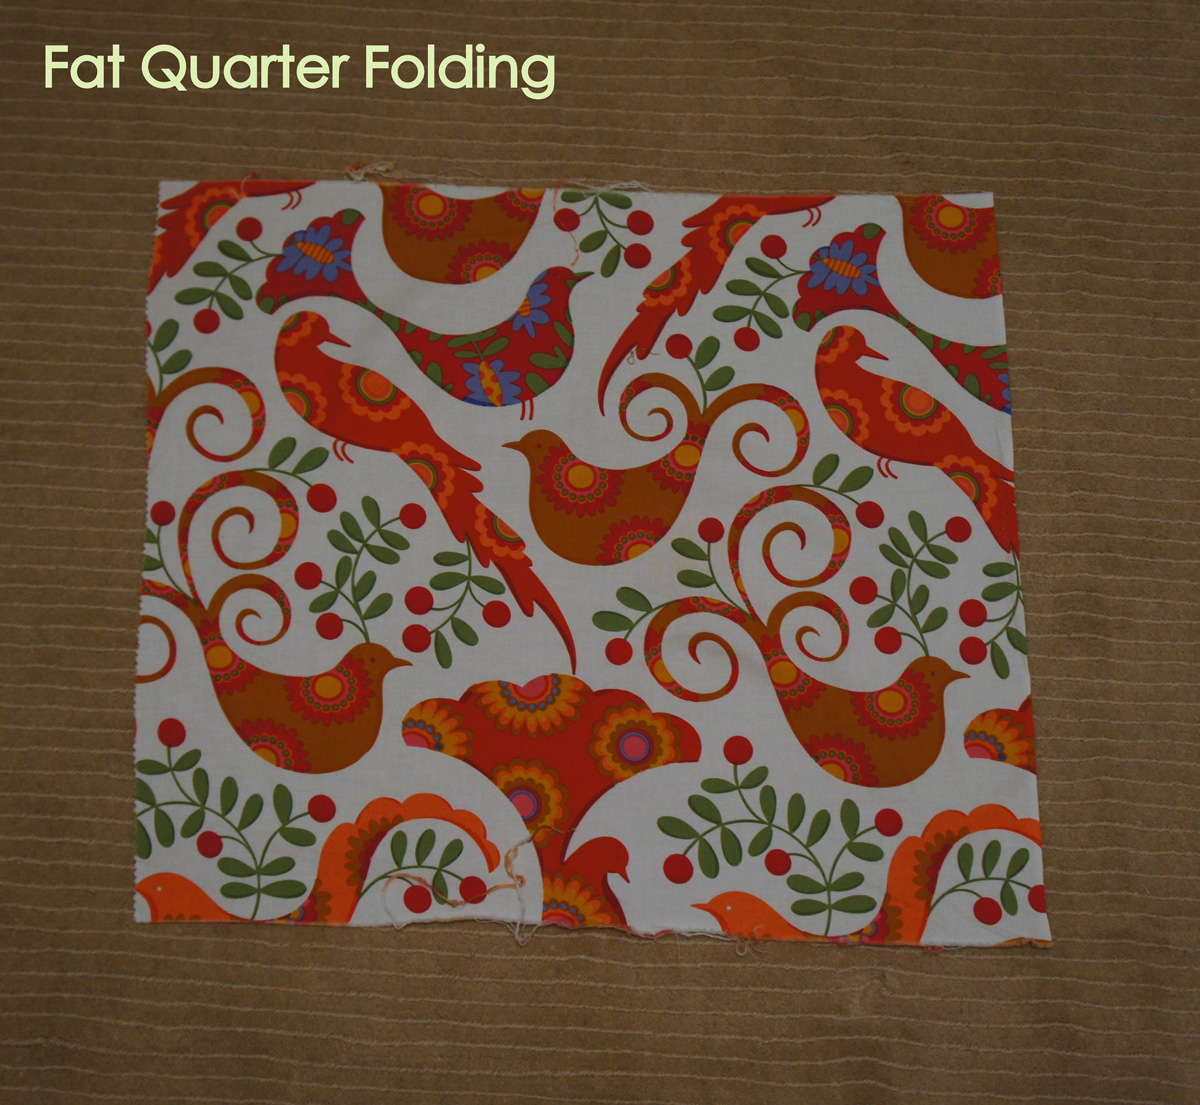
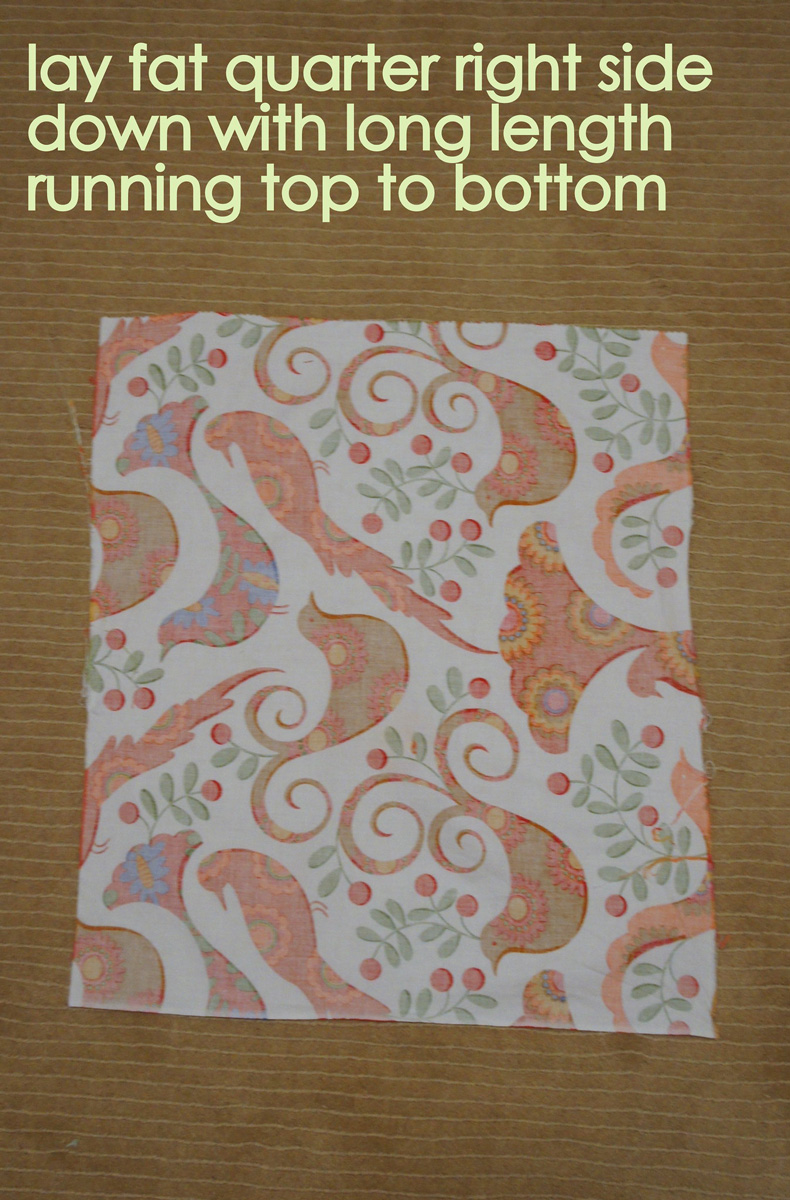
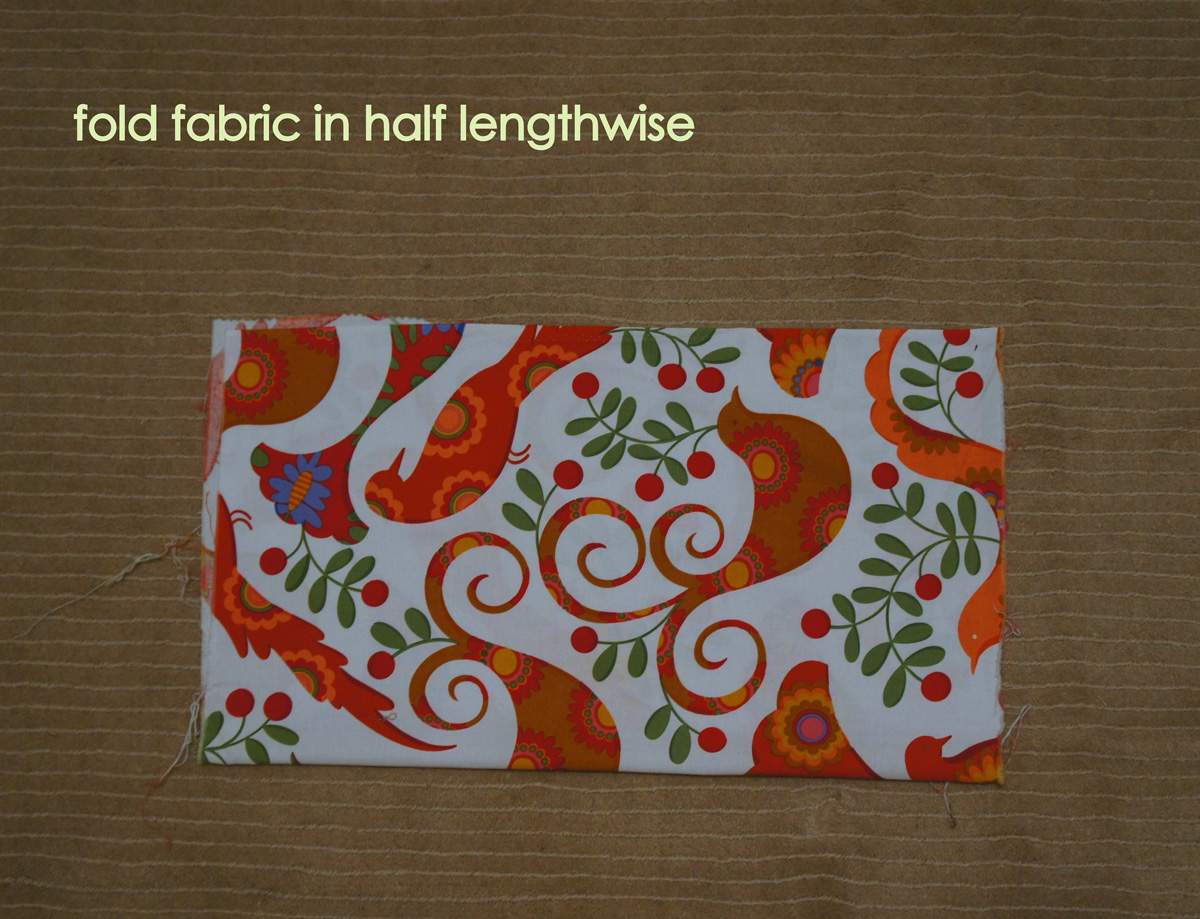
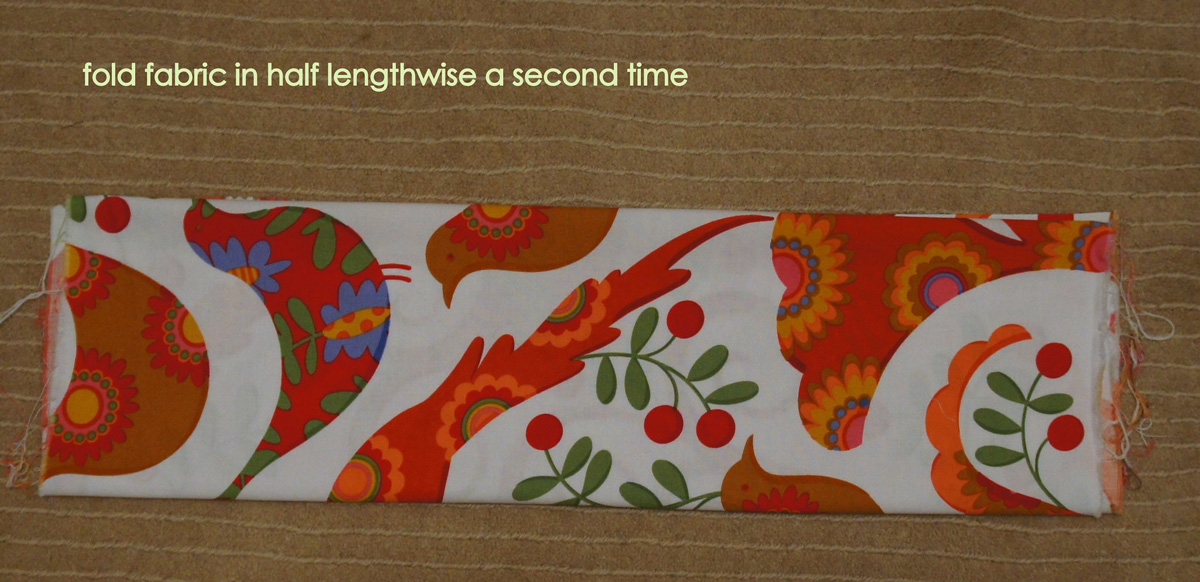
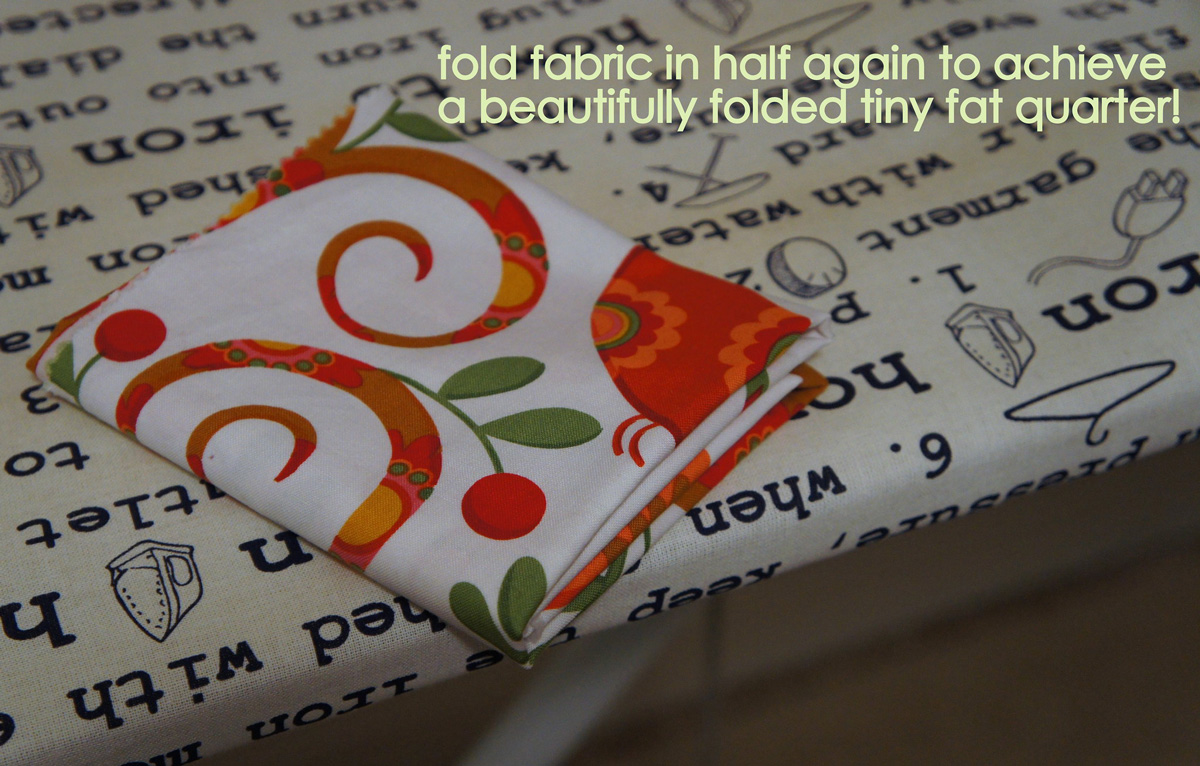
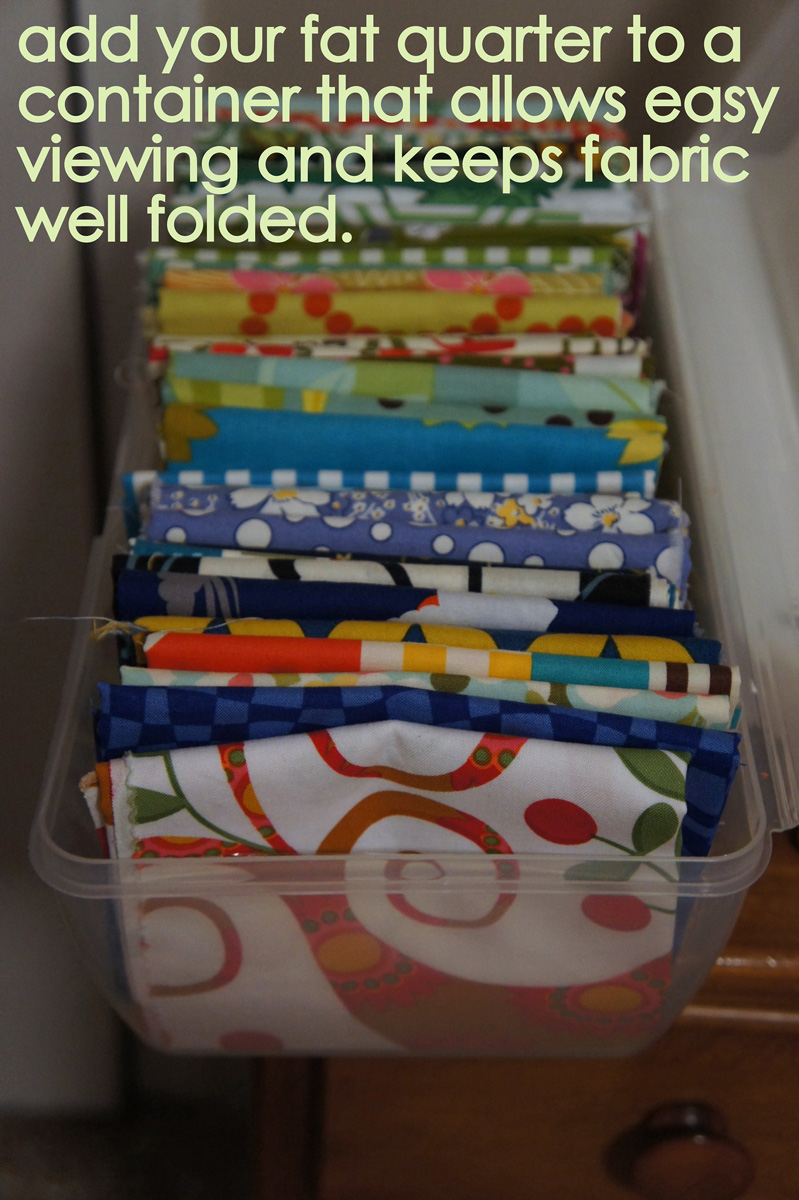
Now folding fat quarters is a matter of preference. As I mentioned in an earlier post, I have recently decided to separate all of my fat quarters and put them together in one place. I like the following method for fat quarter folding because of the tidy small square you have in the end. And, as a bonus, this is often the way fabric stores fold fat quarters. So no refolding may be required.

Clear? Not clear? Let me know! I hope that you all soon have beautifully lined shelves of mini bolts of fabric. It makes the fabric feel more like a luxury and less like a mess! Embrace your organized side!
You are a clever girl – and SO tidy! I tried to teach Yr 7 (12 years old) BOYS to fold lab coats today! Now that was funny!
I'm so going to sort my stash out this way! Thanks for showing me how!
What a fantastic idea! I might just give this a try 🙂
Thanks for the tutorial!! I found this really, really useful! I wonder if you could cut poster board to that size and use that? I think buying the board from the comic book shop could get expensive if you had to buy much of it.
my son gets alot of mail in the large envelopes. I cut them to size, they aren't as firm as the
comic boards which he has from yrs past, but they do well enuff. I also will fan small amts on one 'board', so they are together. but the price works well, other wise they go to the re-cycle box,
I bought 100 comic book boards for $8.39 on Amazon.
Mama Spark, thank you for the reminder. I meant to mention this earlier. I really do think that this is the most cost effective and time efficient way to do this method. A pack of 100 boards cost me approximately $9.00. This can be more or less depending on where you buy them…I've found them to be cheaper at a local store than online. But it's always more convenient to order them online. So it probably depends on how many of these you need.
Angela, I have used these for a few years now and they are great for smaller yardage. If you have over 3 yds of same fabric then it will be really hard to keep the card stock upright when you put it on the shelf ! I even doubled my card stock so just gave up and folded my larger yardage and placed it flat on the shelf!
I just did this last weekend and it makes my fabric so much easier to access and play with. I put all my fat quarters onto mini bolts, too, because it just makes it easier to see everything all together … for mixing and matching.
okay. maybe i'm being dense, but based on your pics, the blue fabric bolt ends up being taller than the tufted tweets chairs, right? because one pice extends higher than the board, and the TT piece is folded to fit the height of the board? doesn't this look weird on your shelf, or am i just being OCD? i got a new shelf this weekend, which a friend helped me fill with my fabric, but i don't like stacks, and this way would be awesome.
I'm jumping in very late in the conversation, but I see the problem here. I read about this comic book folding business and then I Googled a tutorial with pics. Cut To Pieces looked so clear, I picked this one. I folded about 6 pieces of fabric and then I realized it would be better just to make the fabric fit to the board however you can. In other words, folding 2 selvages toward the center or selvage to selvage and then again yields irregular results.
Now I just wrap the start of the fabric around the top, keeping the edges perpendicular, and then fold, fold, fold. All my bolts are the exact same size and much more secure. I can even fold five yards with the same results.
Doesn't it looks lovely!? I did mine couple of weeks ago and I'm loving it…not only do I know now what I have but it also helps with motivation :-).
Oh I love this idea! I don't have any comic stores near me, so I might have to do a search on ebay. Thanks for the tutorial!
Or Amazon…
In response to Amy's question of comment 7:
no you are not being dense. lol they do end up slightly heights, but only by about a half an inch. When you have them all stacked together it really doesn't make too much of a difference that things are different heights. It's all dependent on how the manufacturer makes the fabric and the true width…so there is variance regardless even if all the pieces you fold are from selvage to selvage.
I'm out of control and inspired by you! It just sucks that I live in the Middle East and don't have access to comic book boards right NOW! I have a friend coming over to check out my home and my one year old sewing studio and she will be eyeballing my stash! So, I want to do it this weekend! (Thursday and Friday is our weekend). I wonder if that poster board will work???
yes, poster board would work I think…but I would try a heavy card stock and trim that if necessary first…it will be a lot more economical I think and less time consuming. And you may find that you don't need to trim the card stock.
You are inspiring me to organize my stash! Thanks for the tips 🙂
Oh sweet mercy but that's a spectacular stash!! I love, love that they look like tiny bolts on your shelf 🙂 May have to make a trip to the comic book store …
Lovely tutorial Angela – thank you !
I use a really similar method but without the boards – I use the width of my cutting ruler and wrap … they're not as stiff, obviously (!) but they still stack vertically pretty well … The bonus is that you can use a wide ruler for your larger pieces and a small ruler for your FQs!
the tutorial I found for it is here
(but shows them stacked horizontally)
I officially am suffering from stash envy now. 🙂 I have mine sorted by size and color in fabric cube bins to protect them from dust and light, but they sure get messy when I'm rooting around in them for a project! Maybe I can combine the two methods….
This is great (yes, over a month after you posted…LOL!). My stash is all over the place and I've been struggling with how to get it organized. This is fabulous! Thanks for sharing. 🙂
I just found this tutorial! This is SO great, Angela! It's like you have a little fabric store in your crafty space! I have get the boards now from Joann. Of course, with a 40% off coupon!
Totally late to this game, but I just wanted to say I'm jumping on the bandwagon. Found a pack of 100 on Ebay for $9 (includes shipping). Can't wait to get all my fabric organized and pretty! 🙂
i love this idea. i bet there are no comic book stores in this town. we only have one starbucks. it is pitiful. maybe i can just cut cardboard or card stock. i really need to do this. thanks for the tute.
Ok, I did it!!
http://www.skooksplayground.com/2011/05/organizing-fabric-like-superhero.html
Thank you, thank you! My husband looks at my overflowing boxes & gumbled up closet of fabrics and thinks it's an overwhelming mess. I can't wait to surprise him! I have a lot of decorator-weight remnants in odd sizes. Folding them & putting them on the board is a miracle for organizing them. Sometimes I attach a note with measurements since most pieces are non-standard or they have been cut for another project.
I have just been on the www and ordered some comic book boards, cant wait to get my stash looking like this.
Thank you so much for this idea! I ordered mine online, and if you buy them in bulk, was able to get them for a little over $5.00 each. Of course there is the shipping, but I think it worked out pretty well. I'm LOVING the way this looks and is so much easier finding what I have. Once I finish getting mine finished, I will be linking back to you blog to give you credit for the idea. I hope that's okay! Thanks again for a wonderful suggestion!
This is wonderful!! Thanks for sharing the know how!!
Thanks for the GREAT instructions on using the boards! My stash is looking tidier by the moment. You are a miracle worker! Thanks again.
thanks for this great idea. You can check my blog to see the progress I have made so far. I ordered one pack of 100 backerboards and used them all..so I have ordered two more packs.
hugs
beebee
Thank you so much!! I am trying to re-organize my sewing room and this tutorial will be so helpful!! I am off to find some backerboards or cardstock and hope to get all my fabric out of my big blue bins soon, so I can see them!!!
I've done this in my studio apartment and now my sewing stash makes for a beautifully decorated bookshelf. The real test is to see if I can get my students to help me mini-bolt about 20 bins of fabric at the after school art center where I teach. The bins just collect dust – hopefully the fabric will be used much more once it is on display and organized! Thanks!!
Wow! LOVE IT!!! I will be looking for those comic boards this week! How wonderful! And I love how inexpensive too….some of the other storage ideas just take way too much money that I'd rather spend on the fabric itself! 😉
Thanks for sharing!
My boards arrived today, now the folding and organization has to begin.
Oh, my! I have to look at this idea closely! Your fabric looks amazing.
I love this. I have mine fabric in banker boxes. I try to keep them organized by type (100% cotton, knits) but my method does not allow me to see my fabric without opening boxes. Nor is it conducive to keeping my stash organized. I started converting my stash to this method. It is much simpler and is much easier to work with when bringing new fabric into the fold.
I have not heard anyone mention the acid-free factor. Some of my fabric stays around for a long time and I wonder if it would effect the fabric in any way. The new plastic boards are great, but too expensive. I buy acid-free plastic at Home Depot and cut it myself. It still costs more than backer board and is a pain to cut. I am just worried about the fabric, but am loving how it looks and how convenient it is!
It works great. I do the same only using mat board from a frame shop. They have alot of scrap. They were giving it to schools for art and they had too much. I cut it to size (any size I need for the container or shelf.) It's acis free. Check your local frame shop.
Vicky
I've seen a number of these tutorials. This is written the most clearly. Thanks. I just got my comic book boards, I'm off to follow your directions. 🙂
So I went to my local comic book store, and he was amazed with what I wanted the boards for, he had ordered one thousand boards that weren't selling. I told him to go into the quilt store down the block, and let the quilters know what he had. So he gifted me 100 boards and I just finished "boarding" my stash. Thanks to you it looks amazing, even hubby was impressed! Thanks so much for the tutorial!!
Thank you so much for your ideas on how to keep quilting fabrics neat! I hope to get my fabric stash tamed down now so I can find what I need when I am quilting.
I wish I had read this 2 months ago. I have nice cupboards in my sewing room, whith closing doors. I just paid a fortune for clear plastic bins that would fit in closets from the Container Store, and still have to go through and properly fold and sort. Would have much prefered your set-up. Now, do I start over, and if so, what do I do with all those bins?
I just organized my fabric stash using this method, and it is amazing! Thanks again for posting such a great tutorial.
http://www.patchworkduck.com/2012/01/sewing-room-stash-fabric-organization.html
one word : WOW!!!
I've been absent for some time, but now I remember why I used to love this website. Thanks , I'll try and check back more frequently. How frequently you update your web site?
Jet 354166 JDP-15MF 3/4-Horsepower 15-Inch Floor Model Drill Press
Guess what I bought yesterday?? Comic book thingys!!
My question for you is, with our new found stash building with fabric.com coupons ;), how do you store your yardage? Like say 6.5 yards of coal or 7 yards of white or …;)
Krista with large yardage I store those folded neatly to fit in a large open bin that I have on the shelves along with the fabrics. It just makes more sense to know what you have major yardage of. I also store amounts like on real bolts from the fabric store. Joanns always has left over bolts that they will give you for free. So I have a bunch stored that way too.
Oh and I found mine at Hastings for $8. They came in 3 different sizes.
The salesperson said Kmart sells them too.
Super tutorial. Just wanted to add something that was questioned, don't remember who exactly mentioned it, but it had to do with the Acid Free factor of these comic book boards. The person mentioned they used a rather expensive method in order to get the acid free benefit.
I wanted to assure that poster as well as everyone else that these comic book boards ARE ACID FREE. Comic books are very collectable and thus need to be protected in many of the same way our fabrics do, thus these are very very good for both comics and fabrics. So shop away and put those fabrics SAFELY onto these comic book boards 🙂 Your fabric will thank you
I love this idea! And I think I know where I can find a comic book store! 🙂
Thank You !! When we build the new house I'll have the room, sadly my sewing room became my "hospital" room so everything had to find a new home in a bin here at the house or at the storage room. talk about infuriating….my 16 yr old son & my husband packed everything up, still trying to figure out where some embroidered & appliqued blocks ended up. So glad most things are avaiable online, and I find great site & blogs, ya'll keep me sane most days.
Seeing your fabric in your beautiful new sewing room reminded me how much I love your folding tutorial. So, out I went and purchased my supply of comic book boards, and now I have to get busy. They are a little more expensive up here in Canada, but still very reasonable. Thanks Angela!
Great tutorial! Thanks so much! I just began a brand new blog about all my many interests and I am going to post about my own sewing room overhaul/fabric re-organization using your tutorial with a link back to this page for others to do the same! 🙂 I had bought the comic boards months ago after researching how to organize my fabric, but have yet to actually do it. Thanks so much for sharing! I'll try to remember to repost when it's done, but the website is http://fancifulsojourns.blogspot.com. I'm actually going to start working on it tonight. 🙂 Happiness with my fabric.
Sarah
I am ALL over this! Awesome, thanks for sharing!