
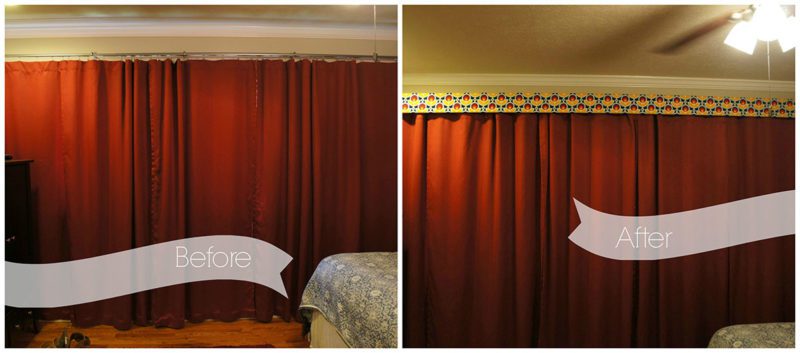
I don’t know if I’ve mentioned it here before, but I have a REALLY hard time sleeping. It’s been on an ongoing problem for at least 10 years and I have yet to find a real solution. I’m working hard on that and part of solution is to ensure a really dark room to sleep in. And that means black out curtains. over 6 windows. That’s a lot of curtains people.
Now I know what you’re thinking. Angela! You sew! Just make those curtains!
Well, have you ever made 6 full length lined black out curtains?! I’ve made 3 before and I didn’t like it. At the advice of a friend, life is too short to work on projects you don’t like. So I opted to buy them ultimately. But they are super expensive to get anything remotely cute. And so I decided to get something functional and try to make it cuter. You can decide if it worked.
Now my disclaimer is that this project would not have been possible without the help of my very talented husband. This involves upholstery techniques, creating a cornice from (2) 12′ 1″ x 6″ boards, and then installing it at a 7′ or 8′ height in a 2nd story bedroom. NOT a one person project. Nonetheless, one that we tackled and I thought I would share it with you.

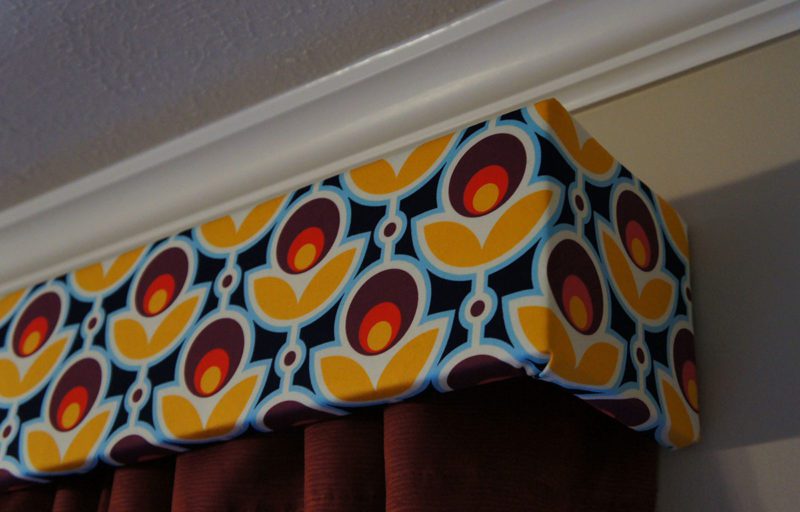
I was able to do this whole thing with ONE yard of 54″ upholstery fabric (this one is from Joel Dewberry that I purchased from fabric.com). I barely managed once again to squeeze out a project from my materials on hand (working hard at working from my stash!). I first needed to trim the fabric to line up the pattern exactly as you can see in the picture above. I cut along the full length of the piece and measure three equal slices of fabric. I then needed to sew these together to create ONE long skinny piece of fabric.
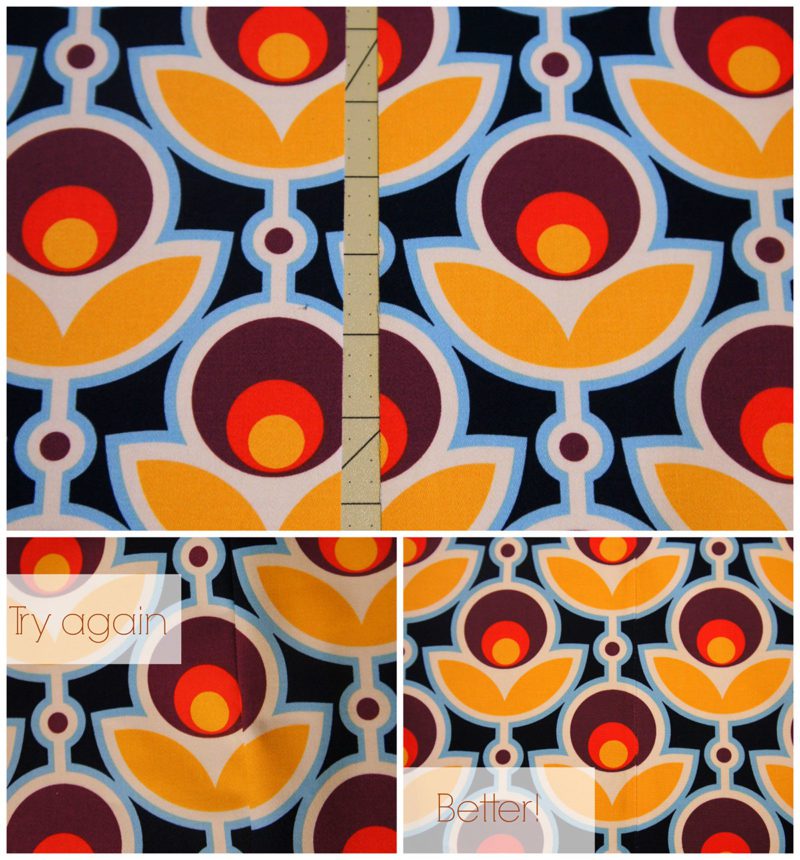
And sewing them together meant pattern matching. That can tricky with an easy repeat, but add in all the curves of this particular pattern and it was…well…it gave me a run for my money. 😉 As you can see in the mosaic above, the first time I sewed my two carefully cut and measured pieces together, my pattern did not match up so well. So I would recommend BASTING first if you are going to try this. My second attempt was a lot better. Not perfect. But that’s when you say screw it, it’s going to be 8′ up in the air anyways. 😉
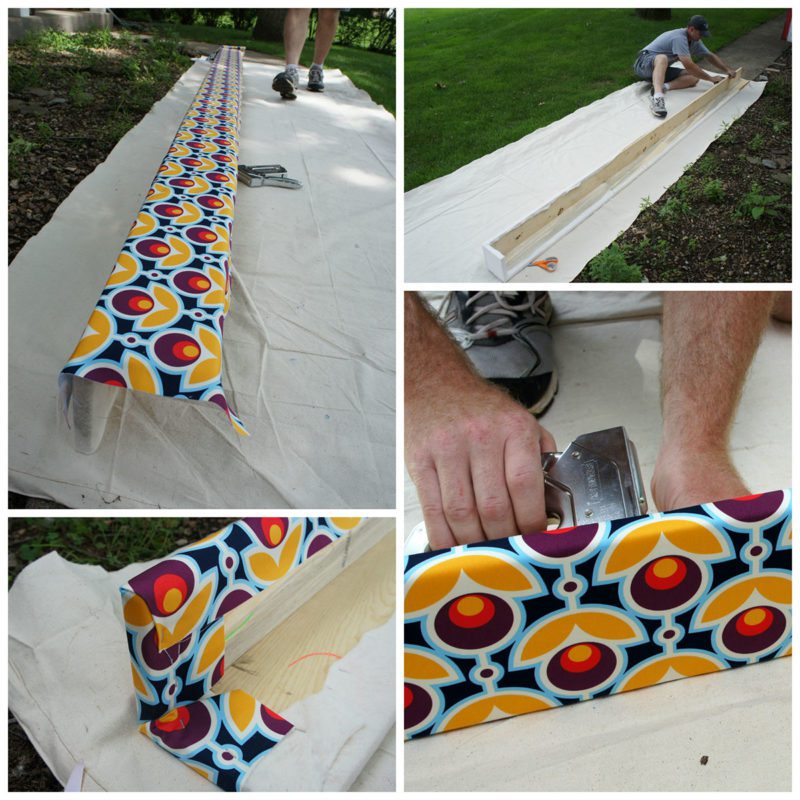
My husband built the cornice board from (2) 12′ long 1″ x 6″ pieces (plus a little piece for the corner). In retrospect we both agree that we should have used a 1″ x 8″ for the front facing board because we think it should have been just a bit longer. But it’s fine and it’s done. Live and learn.
We first upholstered the cornice with scraps of batting that I had. Yay for using up scraps! And then we carefully lined up the fabric to wrap evenly around the face of the board using basic upholstery techniques. Not difficult, just a long straight piece that has some room for error. But my husband and I are both type A enough to handle that. If you are concerned about trying it, then you might want to attempt this whole project with an all over pattern rather than a highly graphic one like we used.
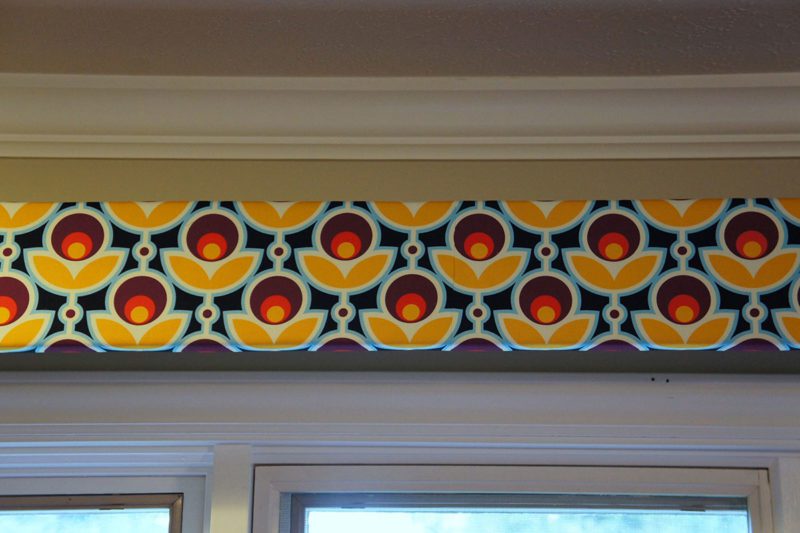
And then up in place it went (into the house, up the stairs, and into the room and on the wall!). If you look closely at that picture you can see one of my seam joints. Doesn’t look too bad. Mike had it installed in a flash actually (he’s so good at that stuff) and before I knew it, the room was just a little bit more interesting.
My view from my bed…the pretty corner of the cornice. And of course, now I have less light in the room because this cornice traps all the light that was shooting out above the blackout curtains. It’s a definite improvement over all, and as always, another learning experience. And it is so fun to have some more “quilty” fabric in the room. I need to tackle a quilt for our bed and then we’ll really be rocking!

looks great, and the graphic fabric definitely adds a pop of interest to the otherwise plain curtains! i also have a sleep issue, and would prefer total darkness. i live for hurricanes when we put up the custom plywood coverings on the windows and there's no light in the bedroom!
Looks great! Your husband is amazing and so handy. I had problems sleeping my whole life. I finally surrendered and got into a sleep clinic (long wait) and was diagnosed with sleep apnea. My life is 1000x better! It has only been a year since I was diagnosed and my life just gets better – sleep is so important!
Lovely! Isn't it nice to turn something ordinary into something pretty?
What a beautiful and professional-looking project! Good luck with your sleep issues. I think mine are genetic, lol, and here to stay 😀
I'm there with you on the sleep issues. I've also both made and bought blackout curtains, and I really prefer to buy them too. I've found buying that much home dec weight fabric usually ends up costing more than the already finished curtains. I really like the cornice idea and might have to try that as well. 🙂
P.S. Have you ever tried nutmeg? A tsp in a cup of yogurt or applesauce can make falling asleep easier. My doctor actually recommended this and it works for me about 75% of the time.
I had to laugh at your post! Why – cause I am a curtain maker by trade and on all of my windows are wooden blinds! The thought of making my own coverings just makes me want to cry! I totally love your pelmet though.
Wow hats off to you! that is really nice turn out.
Way to go for working on the sleeping issues. I did the same 20 years ago and what a tremendous difference! It takes a long time to break old patterns and build new ones, but just keep at it. It's so worth it!
Those cornices look really cute! It's amazing how a little change can make such a big difference. Maybe you could add some matching trim to the bottom of the curtains to customize them a bit (maybe the plaid or trellis prints from Heirloom?)
It's beautiful! I made my husband put crown molding on ours so I would just have to paint. All that fabric matching and getting it on straight would have done me in.
It looks really really lovely! It's such a great color and architectural detail you added. It makes the whole thing look more fancy and expensive. Great job!
It looks fab, well done all! I did have to giggle at the type 'A'ness of the participants ;o)