
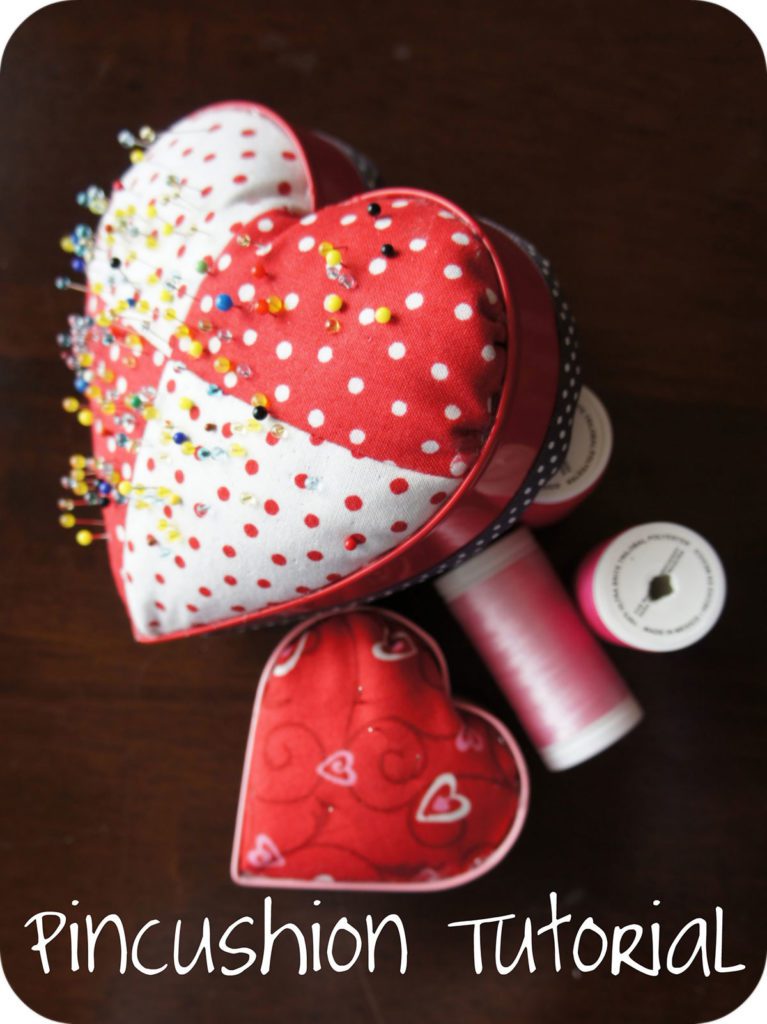
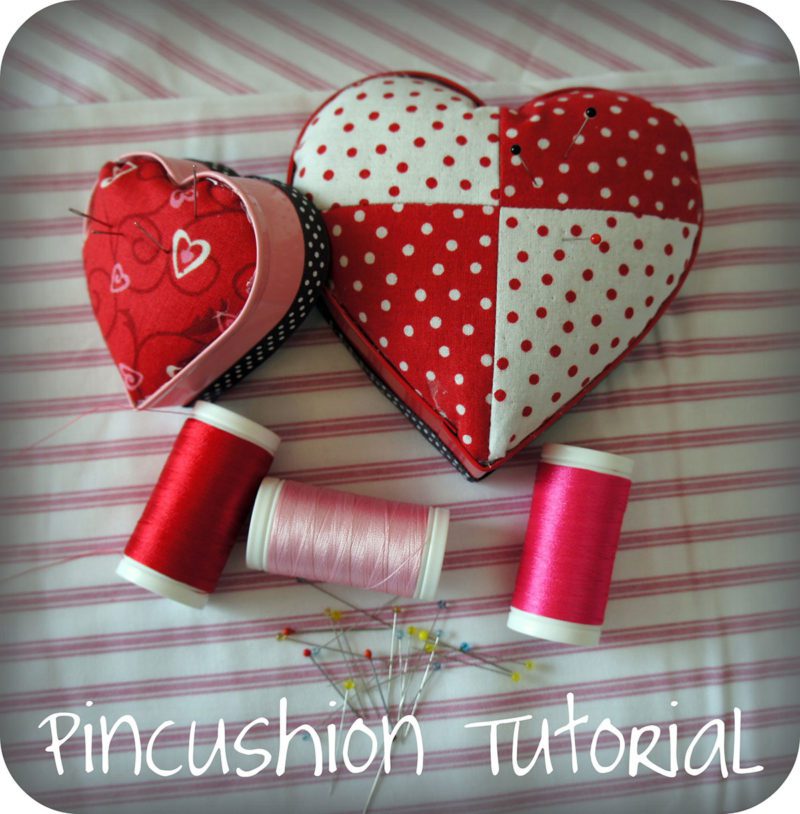
I have a special valentine’s project for you! A Heart Shaped Pincushion! But part of the beauty of this tutorial is that you will be able make any size or shape pincushion because it is all based on a cookie cutter.
Note: Be sure to read all the written instructions as well as the instructions with the picture mosaics.
Supplies:
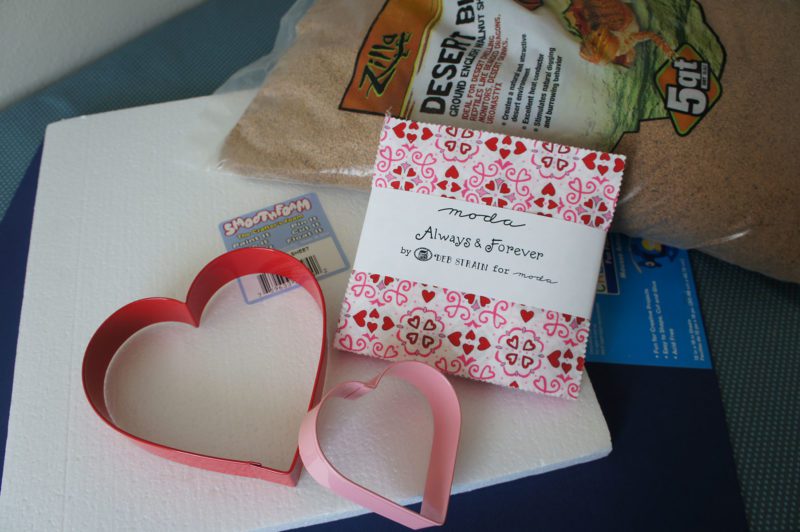
• one charm pack (really I just use a few charms for this…so a whole charm pack isn’t necessary)
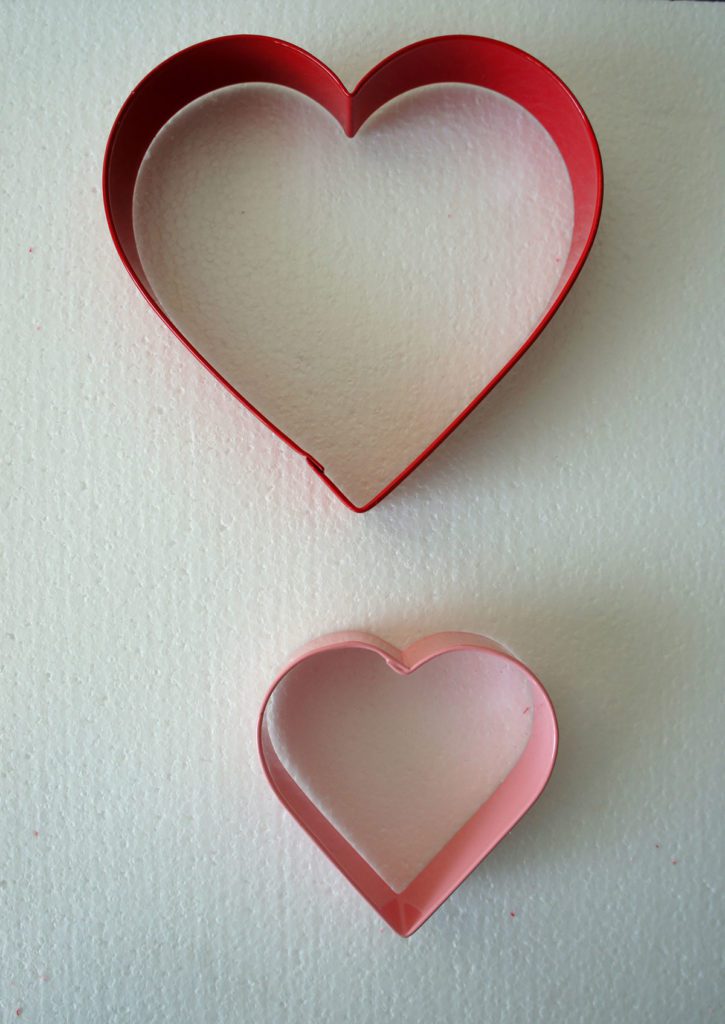
• cookie cutter (clearly I used a heart shaped one…size is your preference)
• Hot Glue gun
• One sheet of fun foam (the stuff in the kid’s craft aisle)
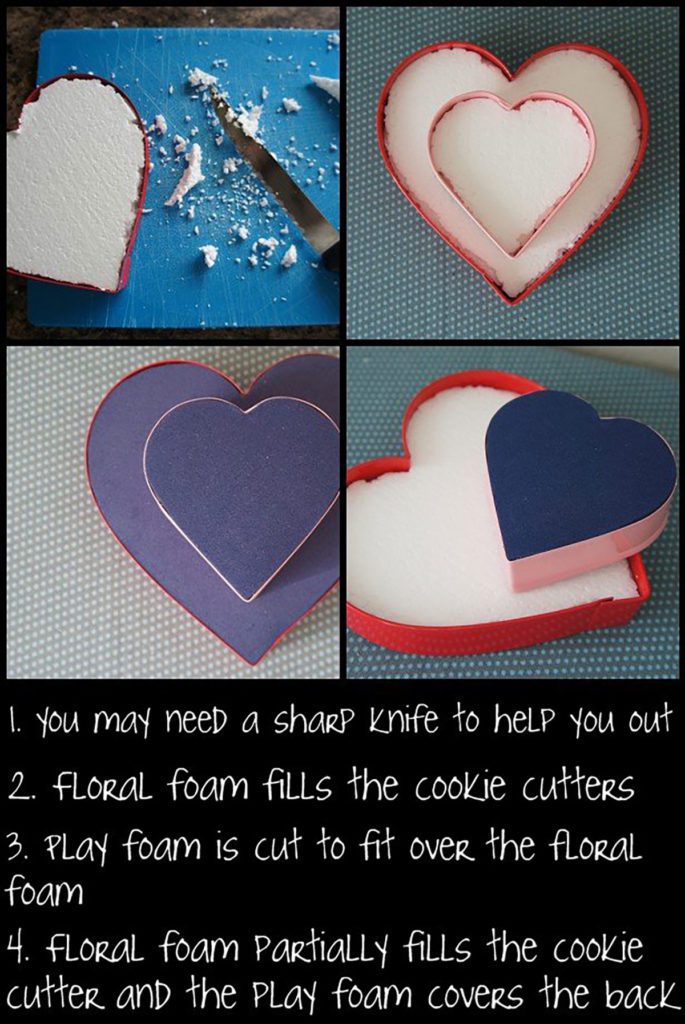
• One sheet of a thin floral foam / Styrofoam (can be found in the floral aisle)
• One bag of Zilla brand lizard litter – crushed walnut shells (one bag will last a LONG time)
Instructions:
Cutting Fabric for the Pincushion
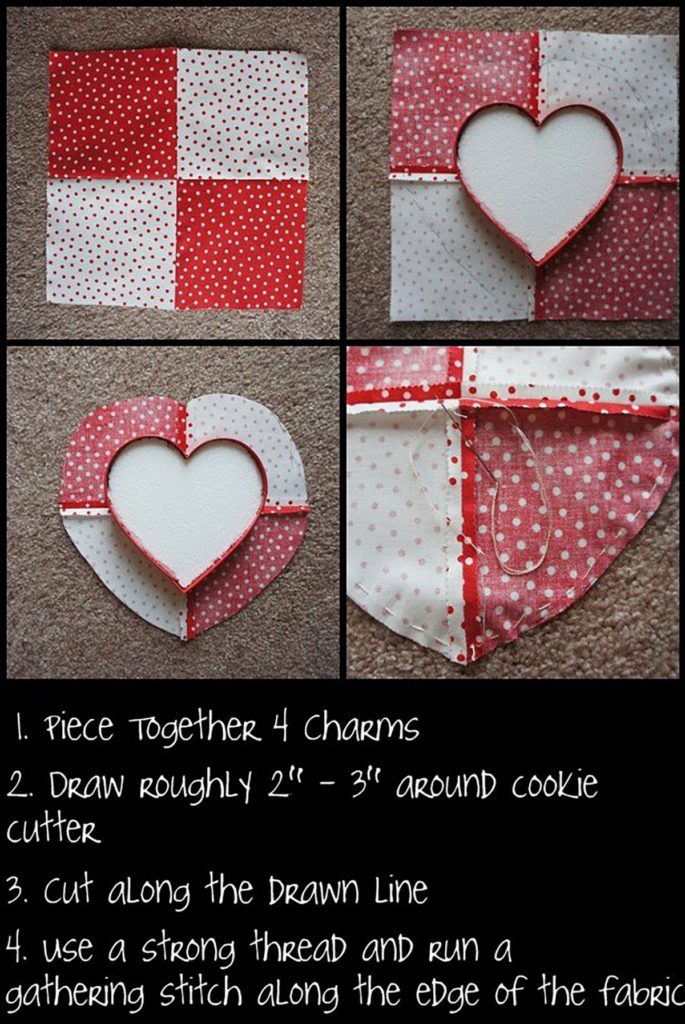
• Pick out your favorite charms and if necessary piece them together to create a large enough piece of fabric for your cookie cutter plus 3″ around. Then follow the directions in the mosaic below.
Cutting Foam for the Pincushion
• Use your cookie cutters to cut out the floral foam to fit exactly inside the cookie cutter. Depending on the foam you use and how sharp your cookie cutters are, you may need a little help from a kitchen knife. Then trace around the cookie cutter onto the fun foam and cut out the exact shape of the cookie cutter for the bottom of the pincushion.
Fitting the Fabric to the Cookie Cutter
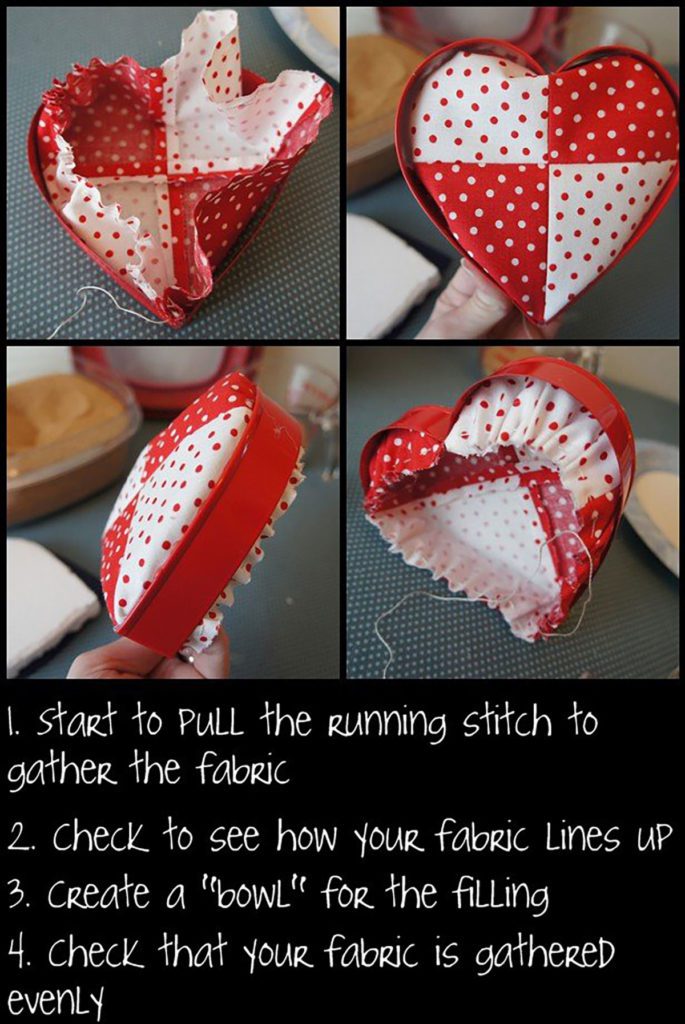
• Pull your running stitch slightly to start gathering the fabric and fit it to the shape of the cookie cutter. You will want to shape it so that a small “bowl” is formed on the topside of the cookie cutter/pincushion. Use your hot glue gun and glue the fabric to the inside of the cookie cutter around the whole perimeter.
Filling the Pincushion
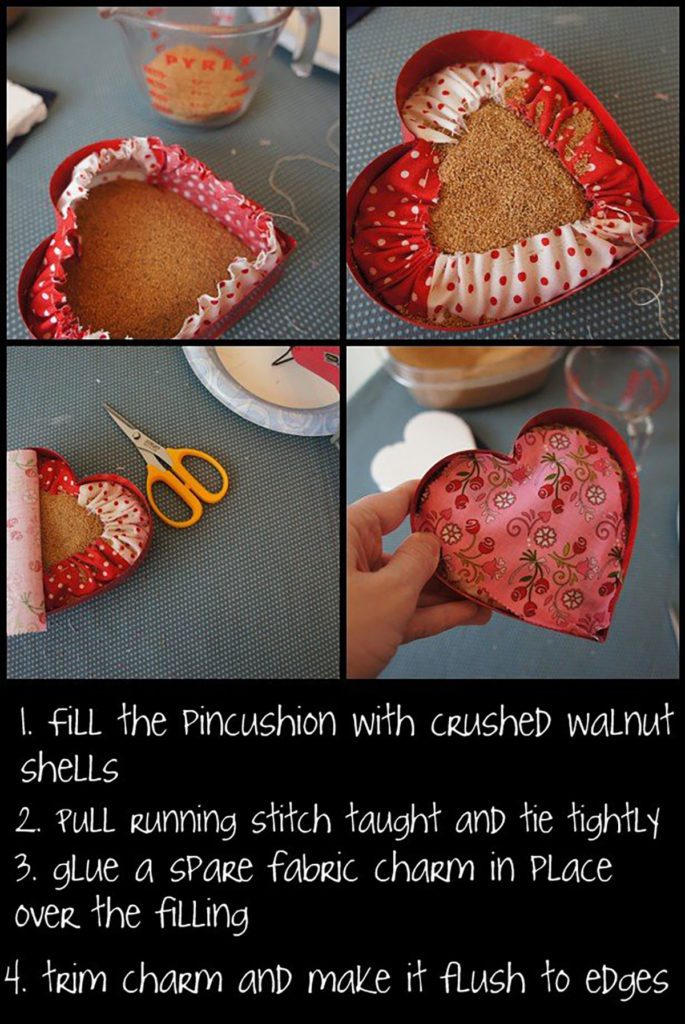
• Use the crushed walnut shells to fill the pincushion. Crushed shells create a great weight to the pin cushion and they help keep your pins sharp. The type I used was like a coarse sand. The amount you need will depend on the size of your cookie cutter but I used about a cup for the large one. You will want to hold up your cookie cutter while filling it to make sure that you put enough in to round out what will be the top of the pincushion…that “bowl”.
Putting the Bottom on the Pincushion
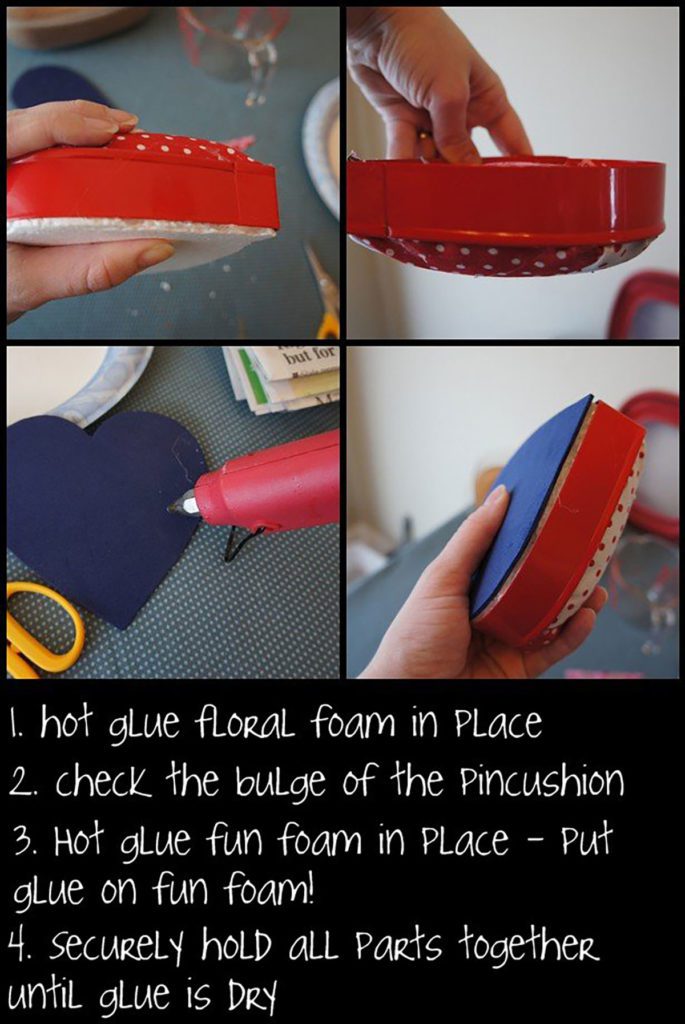
• With the charm glued firmly in place, there should be no chance of any filling escaping. But we have two more layers to add to the bottom to make it completely finished and polished. First add the floral foam and hot glue in place. I found that the hot glue actually melted my foam a bit, so I used that to my advantage and created a perfect seal around the perimeter. Then I used hot glue on the fun foam and attached it firmly to the floral foam.
Finishing Details
• You may find you have a bit of a gap now at the bottom of your pincushion or things are not as tidy as you might like. So make it all beautiful again by hot gluing a bit of ribbon or trim around the perimeter of the base.
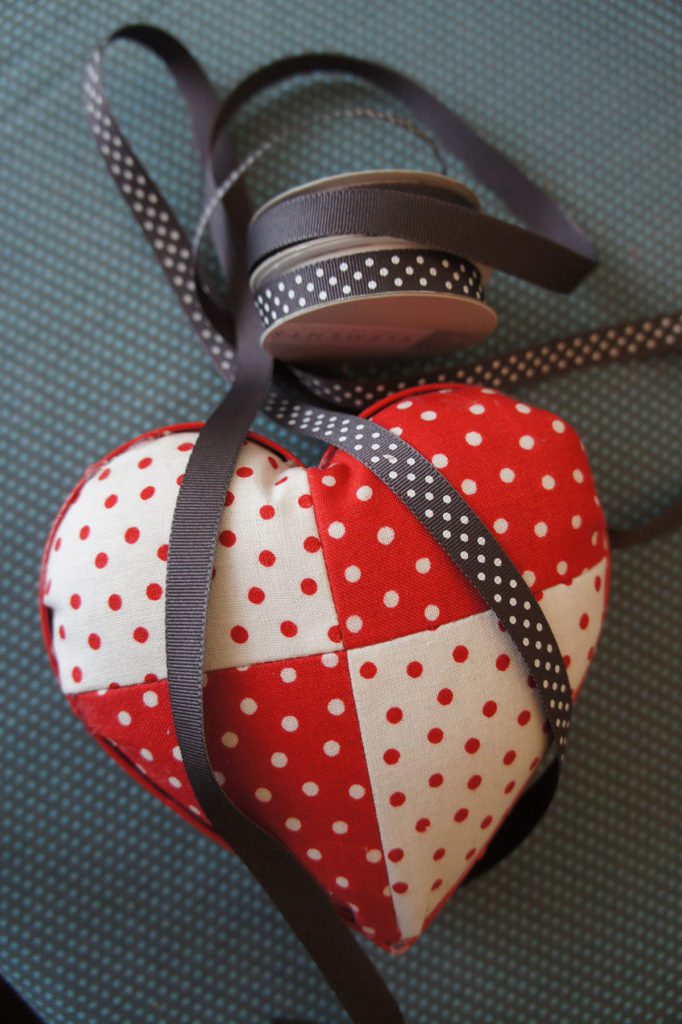
• Fill with pins and use often! Make them in all shapes and sizes. I made a smaller one for my needles as well. (Although I’m thinking of putting some felt on that one)
I hope you enjoyed the tutorial and are inspired to make a pincushion for every season. I’ve already bought more cookie cutters to make more!

I'm single so I tend not to pay attention to Valentine's Day… but I like the cinnamon hearts that come out at this time 🙂 BTW… where did you get such big cookie cutters?
I am a follower 🙂
Love the pin cushions. We don't celebrate Valentine's Day in any special way. Thanks for the giveaway.
My least favorite thing about Valentines Day is that it's so red and pink! Also the slew of holiday craft posts (no offense).
I follow you.
PS putting my feelings about Valentine's Day aside, your pincushion is very cute. 🙂
I dislike all the waste and junk the kids bring home from their parties at school. I find Spider-man valentines and the like frequently in random places all year long.
Love this tutorial!
Lovely pincushion.Thanks for sharing.I don´t celebrate valentine.
I`m a follower.Thanks for the chance.
I'm a follower! Love your Blog!
My favorite thing about Valentines is that I can be super lovey dovey with my husband (like I always am) and no one seems to mind. It's just expected. I think that's fabulous!
I am a follower.
My least favourite thing is the commercialization of the holiday. When I was young (and that wasn't that long ago) it was a simple thing. We made paper valentines and gave them to our classmates and my mom made heart cookies.
Cute pincushion! 🙂
New follower!
I love the chocolate…until February 15, then I hate the chocolate, or rather what it does to me.
I am a follower.
I've kind of gotten away from celebrating because my girls are no longer children and I don't have to help plan parties and address cards. I still love getting candy though!
Love the pincushion. My youngest daughter is born on Valentine's Day. It has always been her day. This year, her to-be fiance' is asking her to marry him officially with the ring in hand. Both sets of parents and siblings have been invited to take part. She still does not suspect…hopefully it can be pulled off. To all hopeless romantics out there…share the love.
My favorite thing about Valentine's Day is buying lots of good chocolates at a reduced price on Feb 15. Thanks for the tutorial too!
Great tutorial. Checked around. Love your zig zag tute! Very clever. My hubs and I will do a dinner thing. For me not cooking is such joy!
I hated Valentines as a kid because it was a popularity contest…and I didn't win.
I am a follower.
Angela, this is a great tutorial!! And with all the different cookie cutter shapes available you could make these until the cows come home and still not be done!!
I follow you blog
I'm a follower!
Great tutorial, thanks for sharing! My fave about V-Day is the chocolate…but the kind I buy for myself and the kids! Even though they won't admit it, they both secretly look forward to their Valentines 🙂
My favorite thing about Valentine's day is the cute cards!
I'm a sucker for pincushions…. Love this one and can't wait to try it.
Thanks for the tutorial. The thing I most and least like about Valentine's Day is chocolate. I have a love-hate relationship with chocolate. I love it but don't love it on my hips, LOL.
I must admit to being a bit jaded – not much of a Valentine's fan!
I'm not a big fan of Valentine's Day…feels too contrived for me. I do like the half price chocolate at the stores on the 15th! Thanks for a chance at your giveaway.
I am a new follower.
I like the "heart shapes" everywhere. I like seeing the young getting Valentine cards in school; the older group getting their first carnations. I like all the flowers — and of course, CHOCOLATE.
Our anniversary is on the 10th, that means we usually combine the two celebrations into one. Not sure how I feel about it, but as long as I have chocolate I'm ok.
Flowers and Candy without guilt!
Thank you. Love this tut! I follow.
I found out about you via the Blog Hop and am now a follower!
Cute pin cushion! Clever to use the cookie cutter! Honestly, valentine's day was never really a big deal for me. Hubby and I will do something small, like nice chocolate after the kids go down, but really, we hardly need an excuse for that!
What a darling idea! Cookie cutters? How clever, gosh I could make one for every season and holiday. hehe. Well, my hubby is in the same camp as your's. We really don't do much for Valentines.
Thank you and FQS for an awesome giveaway and a chance to win.
usairdoll(at)gmail(dot)com
Funny my husband thinks the same thing.
I am now a follower
I'm a follower 🙂
What a fun idea for a pin cushion and would be fun to try with other shapes too. I am not into cards either and I can't eat chocolate anymore, so that kills it for me, lol.
Debbie
I Love your pincushion! Cookie cutters? How clever. Gosh I could make one for every season and holiday. hehe. I have a bag of crushed walnuts as I've been wanting to fine a great pincushion pattern. Thanks for your tutorial! As far as Valentines, my hubby is in the same camp as your's. I have great memories from when my kids were young making sweets and activities in school.
Thank you and FQS for an awesome giveaway and a chance to win.
usairdoll(at)gmail(dot)com
I think my favorite thing about Valentine's day is the candy.
Yes, I'm already a follower.
Thanks again for a chance to win.
usairdoll(at)gmail(dot)com
It's nice to find new blogs to follow through this contest. Valentine's Day falls just when we need a little lift–and what is better than bright reds, pinks and whites. Of course, there's chocolate–everything about Valentine's Day is happy!
I end up being "anonymous," but I'm Delcia, rosenowde@live.com
I used to be a romantic, but now I agree with your husband about it being too commercial. I like my husband to buy me flowers because he wants to and when he wants to.
I follow!
Great tutorial, thanks! We aren't hugely into Valentines Day, we usually celebrate with the kids on the actual day, and then go out for dinner the weekend before or after!